IBM x3650 User Guide - Page 116
For a battery that is installed in PCI assembly slot 1, peripheral devices.
 |
UPC - 883436059565
View all IBM x3650 manuals
Add to My Manuals
Save this manual to your list of manuals |
Page 116 highlights
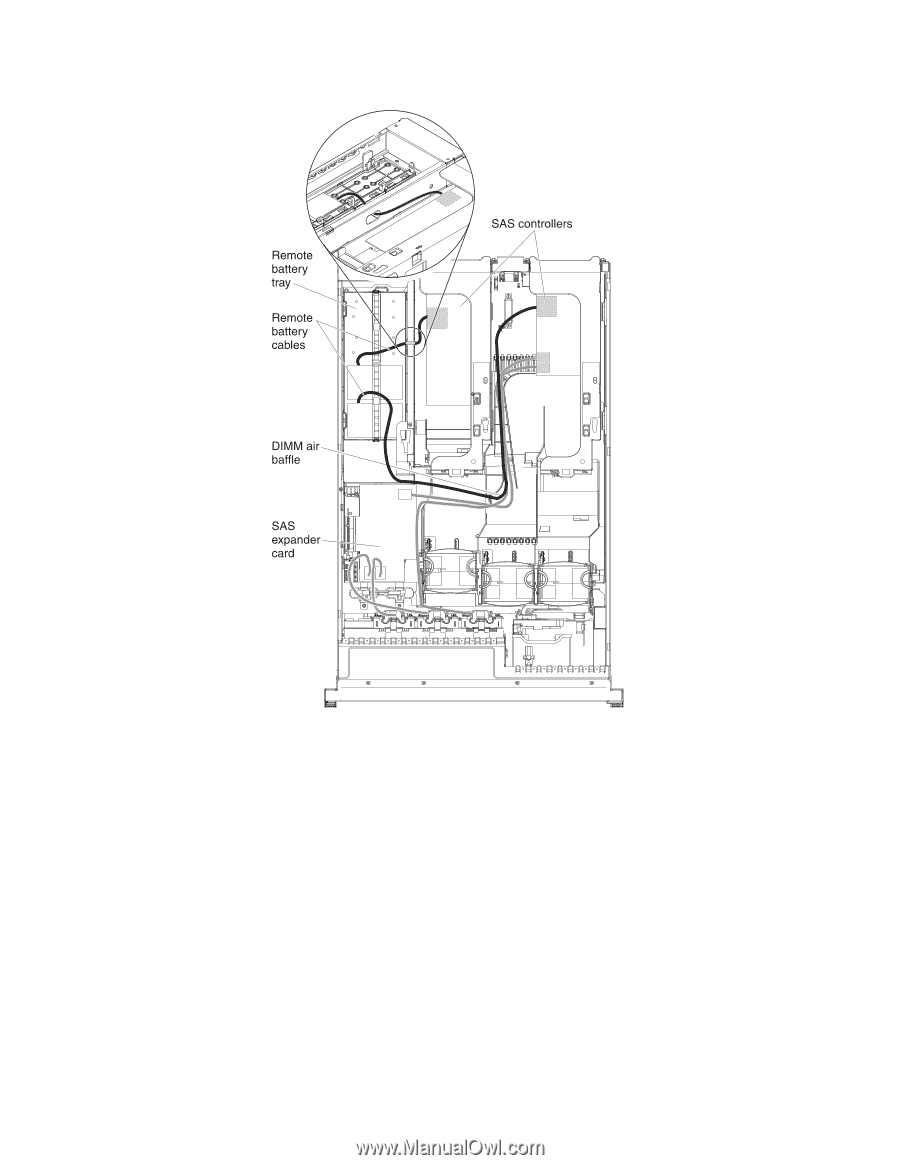
v For a battery that is installed in PCI assembly slot 1: Route the remote battery cable from the ServeRAID controller down through the slot on the left side of the DIMM air baffle, through the notch on the left side of the DIMM air baffle, across to the notch in the microprocessor air baffle, and up to the battery on the remote battery tray. v For a battery that is installed in PCI assembly slot 2: Route the remote battery cable from the ServeRAID controller through the hole in the right side of the power supply (see the illustration detail). 14. To install another ServeRAID controller remote battery in the server, repeat steps 7 on page 97 through 12 on page 99. 15. Install the server cover. 16. Connect the power cords and all external cables, and turn on the server and peripheral devices. Note: The battery must recharge for at least 6 hours under normal operating conditions. To protect your data, the ServeRAID controller firmware changes the write policy to write-through until the battery unit is sufficiently charged. When the battery unit is charged, the ServeRAID controller firmware changes the write policy to write-back. 100 System x3650 M2 Type 7947: Installation and User's Guide
-
 1
1 -
2
-
3
-
4
-
5
-
6
-
7
-
8
-
9
-
10
-
11
-
12
-
13
-
14
-
15
-
16
-
17
-
18
-
19
-
20
-
21
-
22
-
23
-
24
-
25
-
26
-
27
-
28
-
29
-
30
-
31
-
32
-
33
-
34
-
35
-
36
-
37
-
38
-
39
-
40
-
41
-
42
-
43
-
44
-
45
-
46
-
47
-
48
-
49
-
50
-
51
-
52
-
53
-
54
-
55
-
56
-
57
-
58
-
59
-
60
-
61
-
62
-
63
-
64
-
65
-
66
-
67
-
68
-
69
-
70
-
71
-
72
-
73
-
74
-
75
-
76
-
77
-
78
-
79
-
80
-
81
-
82
-
83
-
84
-
85
-
86
-
87
-
88
-
89
-
90
-
91
-
92
-
93
-
94
-
95
-
96
-
97
-
98
-
99
-
100
-
101
-
102
-
103
-
104
-
105
-
106
-
107
-
108
-
109
-
110
-
 111
111 -
 112
112 -
 113
113 -
 114
114 -
 115
115 -
 116
116 -
 117
117 -
 118
118 -
 119
119 -
 120
120 -
 121
121 -
122
-
123
-
124
-
125
-
126
-
127
-
128
-
129
-
130
-
131
-
132
-
133
-
134
-
135
-
136
-
137
-
138
-
139
-
140
-
141
-
142
-
143
-
144
-
145
-
146
-
147
-
148
-
149
-
150
-
151
-
152
-
153
-
154
-
155
-
156
-
157
-
158
-
159
-
160
-
161
-
162
-
163
-
164
-
165
-
166
 |
 |