IBM x3650 User Guide - Page 77
install the tape drive on the tray.
 |
UPC - 883436059565
View all IBM x3650 manuals
Add to My Manuals
Save this manual to your list of manuals |
Page 77 highlights
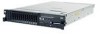
USB hypervisor connector PCI Express SAS controller connector SATA tape signal USB tape signal Tape drive power SAS controller error LED SAS riser card (tape-enabled model server) To install a SATA or USB tape drive, complete the following steps: 1. Read the safety information that begins on page vii, "Installation guidelines" on page 36, and "Handling static-sensitive devices" on page 38. 2. Turn off the server and peripheral devices, and disconnect the power cords and all external cables. 3. Remove the drive tray from the server. 4. Install the tape drive on the tray as shown in the following illustration. If the tape drive comes with a metal spacer attached, remove the spacer before you install the tape drive on the tray. 5. Prepare the drive according to the instructions that come with the drive, setting any switches or jumpers. 6. Remove the server cover (see "Removing the cover" on page 43). 7. Remove the filler panel from the tape-drive bay. 8. Remove the SAS riser-card and controller assembly (see "Removing the SAS riser-card and controller assembly" on page 91). 9. Make sure that the tape cables are connected securely to the following connectors on the SAS riser card: v Tape power cable: tape power connector v Tape signal cable that came with the tape drive: SATA tape signal connector (SATA drive only) or USB tape connector (USB drive only) Chapter 2. Installing optional devices 61
-
 1
1 -
2
-
3
-
4
-
5
-
6
-
7
-
8
-
9
-
10
-
11
-
12
-
13
-
14
-
15
-
16
-
17
-
18
-
19
-
20
-
21
-
22
-
23
-
24
-
25
-
26
-
27
-
28
-
29
-
30
-
31
-
32
-
33
-
34
-
35
-
36
-
37
-
38
-
39
-
40
-
41
-
42
-
43
-
44
-
45
-
46
-
47
-
48
-
49
-
50
-
51
-
52
-
53
-
54
-
55
-
56
-
57
-
58
-
59
-
60
-
61
-
62
-
63
-
64
-
65
-
66
-
67
-
68
-
69
-
70
-
71
-
 72
72 -
 73
73 -
 74
74 -
 75
75 -
 76
76 -
 77
77 -
 78
78 -
 79
79 -
 80
80 -
 81
81 -
 82
82 -
83
-
84
-
85
-
86
-
87
-
88
-
89
-
90
-
91
-
92
-
93
-
94
-
95
-
96
-
97
-
98
-
99
-
100
-
101
-
102
-
103
-
104
-
105
-
106
-
107
-
108
-
109
-
110
-
111
-
112
-
113
-
114
-
115
-
116
-
117
-
118
-
119
-
120
-
121
-
122
-
123
-
124
-
125
-
126
-
127
-
128
-
129
-
130
-
131
-
132
-
133
-
134
-
135
-
136
-
137
-
138
-
139
-
140
-
141
-
142
-
143
-
144
-
145
-
146
-
147
-
148
-
149
-
150
-
151
-
152
-
153
-
154
-
155
-
156
-
157
-
158
-
159
-
160
-
161
-
162
-
163
-
164
-
165
-
166
 |
 |
