IBM x3650 User Guide - Page 72
Installing a hard disk drive - m2 server compatibility
 |
UPC - 883436059565
View all IBM x3650 manuals
Add to My Manuals
Save this manual to your list of manuals |
Page 72 highlights
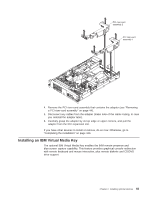
To install a virtual media key, complete the following steps: 1. Read the safety information that begins on page vii and "Installation guidelines" on page 36. 2. Turn off the server and peripheral devices and disconnect all power cords and external cables (see "Turning off the server" on page 21). 3. Remove the cover (see "Removing the cover" on page 43). 4. Align the mounting bracket on the rear of the virtual media key with the mounting tab and slide it down the tab onto the virtual medial key connector on the system board. Press the virtual media key down into the connector until it is firmly seated on the system board. If you have other devices to install or remove, do so now. Otherwise, go to "Completing the installation" on page 106. Installing a hard disk drive The following notes describe the type of hard disk drives that the server supports and other information that you must consider when you install a drive. For a list of supported drives, see http://www.ibm.com/servers/eserver/serverproven/compat/us/. Important: Do not install a SCSI hard disk drive in this server. v Locate the documentation that comes with the hard disk drive and follow those instructions in addition to the instructions in this chapter. v The server supports eight 2.5-inch hot-swap hard disk drives installed on Ultra-Slim hard disk drive trays for 2.5-inch drives. An optional 4-drive-bay kit is available for 12-drive-capable server models. For a list of supported 2.5-inch hard disk drives, see http://www.ibm.com/servers/eserver/serverproven/compat/us/. 56 System x3650 M2 Type 7947: Installation and User's Guide
-
 1
1 -
2
-
3
-
4
-
5
-
6
-
7
-
8
-
9
-
10
-
11
-
12
-
13
-
14
-
15
-
16
-
17
-
18
-
19
-
20
-
21
-
22
-
23
-
24
-
25
-
26
-
27
-
28
-
29
-
30
-
31
-
32
-
33
-
34
-
35
-
36
-
37
-
38
-
39
-
40
-
41
-
42
-
43
-
44
-
45
-
46
-
47
-
48
-
49
-
50
-
51
-
52
-
53
-
54
-
55
-
56
-
57
-
58
-
59
-
60
-
61
-
62
-
63
-
64
-
65
-
66
-
 67
67 -
 68
68 -
 69
69 -
 70
70 -
 71
71 -
 72
72 -
 73
73 -
 74
74 -
 75
75 -
 76
76 -
 77
77 -
78
-
79
-
80
-
81
-
82
-
83
-
84
-
85
-
86
-
87
-
88
-
89
-
90
-
91
-
92
-
93
-
94
-
95
-
96
-
97
-
98
-
99
-
100
-
101
-
102
-
103
-
104
-
105
-
106
-
107
-
108
-
109
-
110
-
111
-
112
-
113
-
114
-
115
-
116
-
117
-
118
-
119
-
120
-
121
-
122
-
123
-
124
-
125
-
126
-
127
-
128
-
129
-
130
-
131
-
132
-
133
-
134
-
135
-
136
-
137
-
138
-
139
-
140
-
141
-
142
-
143
-
144
-
145
-
146
-
147
-
148
-
149
-
150
-
151
-
152
-
153
-
154
-
155
-
156
-
157
-
158
-
159
-
160
-
161
-
162
-
163
-
164
-
165
-
166
 |
 |
