IC Realtime ICIP-B3732Z Product Manual - Page 13
Video Window Setup
 |
View all IC Realtime ICIP-B3732Z manuals
Add to My Manuals
Save this manual to your list of manuals |
Page 13 highlights
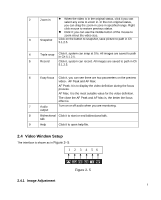
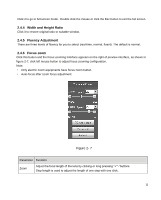
2 Zoom in When the video is in the original status, click it you can select any zone to zoom in. In the non-original status, you can drag the zoom-in zone in specified range. Right click mouse to restore previous status. Click it; you can use the middle button of the mouse to zoom in/out the video size. 3 Snapshot Click on the button to snapshot, save picture to path in Ch 5.1.2.5. 4 Triple snap Click it, system can snap at 1f/s. All images are saved to path in Ch 5.1.2.5. 5 Record Click it, system can record. All images are saved to path in Ch 5.1.2.5. 6 Easy focus Click it, you can see there are two parameters on the preview video:AF Peak and AF Max. AF Peak: It is to display the video definition during the focus process. AF Max: It is the most suitable value for the video definition. The close the AF Peak and AF Max is, the better the focus effect is. 7 Audio output Turn on or off audio when you are monitoring. 8 Bidirectional Click it to start or end bidirectional talk. talk 9 Help Click it to open help file. 2.4 Video Window Setup The interface is shown as in Figure 2- 5. 1 2 3 4 56 Figure 2- 5 2.4.1 Image Adjustment 9
-
 1
1 -
2
-
3
-
4
-
5
-
6
-
7
-
 8
8 -
 9
9 -
 10
10 -
 11
11 -
 12
12 -
 13
13 -
 14
14 -
 15
15 -
 16
16 -
 17
17 -
 18
18 -
19
-
20
-
21
-
22
-
23
-
24
-
25
-
26
-
27
-
28
-
29
-
30
-
31
-
32
-
33
-
34
-
35
-
36
-
37
-
38
-
39
-
40
-
41
-
42
-
43
-
44
-
45
-
46
-
47
-
48
-
49
-
50
-
51
-
52
-
53
-
54
-
55
-
56
-
57
-
58
-
59
-
60
-
61
-
62
-
63
-
64
-
65
-
66
-
67
-
68
-
69
-
70
-
71
-
72
-
73
-
74
-
75
-
76
-
77
-
78
-
79
-
80
-
81
-
82
-
83
-
84
-
85
-
86
-
87
-
88
-
89
-
90
-
91
-
92
-
93
-
94
 |
 |
