Icom IC-M604A Instruction Manual - Page 9
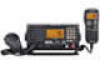
Transmit Power Key [h/l], Volume Control [vol], Mic Connector, Caution: Never, Keypad, Selector]
 |
View all Icom IC-M604A manuals
Add to My Manuals
Save this manual to your list of manuals |
Page 9 highlights
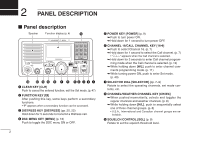
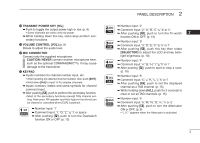
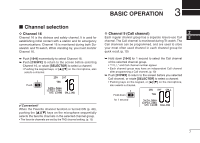
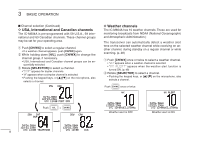
!0 TRANSMIT POWER KEY [H/L] ➥ Push to toggle the output power high or low. (p. 9) • Some channels are set to only low power. ➥ While holding down this key, some keys perform secondary functions. !1 VOLUME CONTROL [VOL] (p. 9) Rotate to adjust the audio level. !2 MIC CONNECTOR Connect only the supplied microphone. CAUTION: NEVER connect another microphone here, such as the optional COMMANDMIC™s. It may cause damage to the transceiver. !3 KEYPAD ➥ Inputs numbers for channel number input, etc. • After inputting the desired channel number, then push [ENT]. • Hold down [0•A] to input 'A' for simplex channels. ➥ Inputs numbers, letters and some symbols for channel comment input. ➥ After pushing [O], push to perform the secondary function. • Most of the secondary functions (except TAG channel setting, Attenuator, RX speaker and Auto foghorn functions) can be cleared or cancelled when [CLR] is pushed. ➥ Number input: '1' ➥ Comment input: '1,' 'Q,' 'Z,' 'q,' 'z' or space ➥ After pushing [O], push to turn the Dualwatch function ON or OFF. (p. 13) PANEL DESCRIPTION 2 ➥ Number input: '2' ➥ Comment input: '2,' 'A,' 'B,' 'C' 'a,' 'b' or 'c' ➥ After pushing [O], push to turn the Tri-watch 2 function ON or OFF. (p. 13) ➥ Number input: '3' ➥ Comment input: '3,' 'D,' 'E,' 'F,' 'd,' 'e' or 'f' ➥ After pushing [O], push this key then rotate [SELECTOR] to adjust the LCD and key backlight brightness. (p. 10) ➥ Number input: '4' ➥ Comment input: '4,' 'G,' 'H,' 'I,' 'g,' 'h' or 'i' ➥ After pushing [O], push to start or stop a scan. (p. 15) ➥ Number input: '5' ➥ Comment input: '5,' 'J,' 'K,' 'L,' 'j,' 'k' or 'l' ➥ After pushing [O], push to set the displayed channel as a TAG channel. (p. 15) ➥ While holding down [H/L], push for 3 seconds to clear or set all TAG channels. (p. 15) ➥ Number input: '6' ➥ Comment input: '6,' 'M,' 'N,' 'O,' 'm,' 'n' or 'o' ➥ After pushing [O], push to turn the Attenuator ON or OFF. (p. 9) • ".1%" appears when the Attenuator is activated. 3
-
 1
1 -
2
-
3
-
 4
4 -
 5
5 -
 6
6 -
 7
7 -
 8
8 -
 9
9 -
 10
10 -
 11
11 -
 12
12 -
 13
13 -
 14
14 -
15
-
16
-
17
-
18
-
19
-
20
-
21
-
22
-
23
-
24
-
25
-
26
-
27
-
28
-
29
-
30
-
31
-
32
-
33
-
34
-
35
-
36
-
37
-
38
-
39
-
40
-
41
-
42
-
43
-
44
-
45
-
46
-
47
-
48
-
49
-
50
-
51
-
52
-
53
-
54
-
55
-
56
-
57
-
58
-
59
-
60
-
61
-
62
-
63
-
64
-
65
-
66
-
67
-
68
 |
 |
