Invacare CRFTI Owners Manual - Page 61
Replacing Anti-tipper, When anti-tippers are used
 |
View all Invacare CRFTI manuals
Add to My Manuals
Save this manual to your list of manuals |
Page 61 highlights
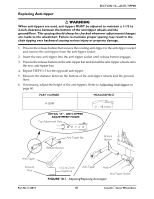
SECTION 10-ANTI-TIPPER Replacing Anti-tipper ƽ WARNING When anti-tippers are used, anti-tippers MUST be adjusted to maintain a 1-1/2 to 2-inch clearance between the bottom of the anti-tipper wheels and the ground/floor. This spacing should always be checked whenever adjustments/changes are made to the wheelchair. Failure to maintain proper spacing may result in the chair tipping over backward causing serious injury or property damage. 1. Press in the release button that secures the existing anti‐tipper to the anti‐tipper socket and remove the anti‐tipper from the anti‐tipper socket. 2. Insert the new anti‐tipper into the anti‐tipper socket until release button engages. 3. Press in the release button on the anti‐tipper bar and install the anti‐tipper wheels onto the new anti‐tipper bar. 4. Repeat STEPS 1‐3 for the opposite anti‐tipper. 5. Measure the distance between the bottom of the anti‐tipper wheels and the ground floor. 6. If necessary, adjust the height of the anti‐tippers. Refer to Adjusting Anti‐tipper on page 60. PART NUMBER MEASUREMENT 1112178 DETAIL "A" - ANTI-TIPPER ADJUSTMENT HOLES Top Adjustment Hole 21 - 1/8-inches Anti-Tipper Ground/ Floor Part No 1134872 Anti-Tipper Bar Release Buttons Release Button 1-1/2 to 2 inch Clearance Anti-Tipper Hole Anti-Tipper Socket FIGURE 10.1 Adjusting/Replacing Anti-tipper 61 Crossfire™Series Wheelchairs
-
 1
1 -
2
-
3
-
4
-
5
-
6
-
7
-
8
-
9
-
10
-
11
-
12
-
13
-
14
-
15
-
16
-
17
-
18
-
19
-
20
-
21
-
22
-
23
-
24
-
25
-
26
-
27
-
28
-
29
-
30
-
31
-
32
-
33
-
34
-
35
-
36
-
37
-
38
-
39
-
40
-
41
-
42
-
43
-
44
-
45
-
46
-
47
-
48
-
49
-
50
-
51
-
52
-
53
-
54
-
55
-
 56
56 -
 57
57 -
 58
58 -
 59
59 -
 60
60 -
 61
61 -
 62
62 -
 63
63 -
 64
64
 |
 |
