Invacare TDXSP Owners Manual 3 - Page 29
Usage
 |
View all Invacare TDXSP manuals
Add to My Manuals
Save this manual to your list of manuals |
Page 29 highlights
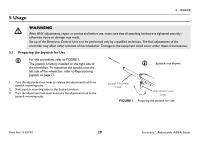
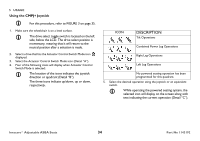
5 Usage 5 USAGE ƽ WARNING After ANY adjustments, repair or service and before use, make sure that all attaching hardware is tightened securely otherwise injury or damage may result. Set-up of the Electronic Control Unit is to be performed only by a qualified technician. The final adjustments of the controller may affect other activities of the wheelchair. Damage to the equipment could occur under these circumstances. 5.1 Preparing the Joystick for Use For this procedure, refer to FIGURE 1. The joystick is factory installed on the right side of the wheelchair. To reposition the joystick onto the left side of the wheelchair, refer to Repositioning Joystick on page 71. Joystick not shown. 1. Turn the adjustment lock lever to release the adjustment lock from joystick mounting tube. 2. Slide joystick mounting tube to the desired position. 3. Turn the adjustment lock lever to secure the adjustment lock to the joystick mounting tube. Joystick Mounting Tube FIGURE 1 Adjustment Lock Lever Preparing the Joystick for Use Part No 1143192 29 Invacare® Adjustable ASBA Seats
-
 1
1 -
2
-
3
-
4
-
5
-
6
-
7
-
8
-
9
-
10
-
11
-
12
-
13
-
14
-
15
-
16
-
17
-
18
-
19
-
20
-
21
-
22
-
23
-
 24
24 -
 25
25 -
 26
26 -
 27
27 -
 28
28 -
 29
29 -
 30
30 -
 31
31 -
 32
32 -
 33
33 -
 34
34 -
35
-
36
-
37
-
38
-
39
-
40
-
41
-
42
-
43
-
44
-
45
-
46
-
47
-
48
-
49
-
50
-
51
-
52
-
53
-
54
-
55
-
56
-
57
-
58
-
59
-
60
-
61
-
62
-
63
-
64
-
65
-
66
-
67
-
68
-
69
-
70
-
71
-
72
-
73
-
74
-
75
-
76
-
77
-
78
-
79
-
80
 |
 |
