Invacare TDXSP2V Owners Manual - Page 55
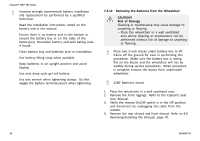
Cleaning Battery Terminals, WARNING, Risk of Injury
 |
View all Invacare TDXSP2V manuals
Add to My Manuals
Save this manual to your list of manuals |
Page 55 highlights
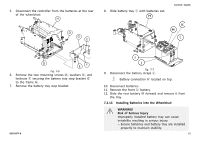
5. Remove the locknut E that secures the bracket F of the POSITIVE battery cable to the POSITIVE (+) battery post of the battery. 6. Remove the locknut G that secures the NEGATIVE battery cable H to the NEGATIVE (-) battery post of the battery. 7. Discard the existing battery per local laws and regulations. Refer to 10.2 Disposal, page 72. 8. Position battery connector bracket I or wiring harness J onto the new 22NF battery or GP24 battery as shown. 9. Secure the NEGATIVE battery cable H to the NEGATIVE (-) battery post with existing mounting screw K and locknut G. 10. Secure the bracket F of the POSITIVE battery cable to the POSITIVE (+) battery post with existing mounting screw L and locknut E. 11. Position each battery terminal cover over top of each battery terminal. 12. Secure battery terminal covers in place with one tie-wrap. 13. Install batteries into wheelchair. Refer to 7.2.13 Installing Batteries into the Wheelchair, page 51. 7.2.15 Cleaning Battery Terminals Controls System WARNING! Risk of Injury Exposure to battery acid may result in injury. - The use of rubber gloves is recommended when working with batteries. - DO NOT allow the liquid in the battery to come in contact with skin, clothes or other possessions. It is a form of acid and harmful or damaging burns may result. Should the liquid touch your skin, wash the area IMMEDIATELY and thoroughly with cool water. In serious cases or if eye contact is made, seek medical attention IMMEDIATELY. - DO NOT install/reinstall a battery with a cracked or otherwise damaged case. 1. Examine battery terminals for corrosion. 2. Verify the plastic caps are in place over battery cell holes. 3. Clean terminals by using a battery cleaning tool, wire brush, or medium grade sand paper. Upon completion, areas should be shiny, not dull. 4. Carefully dust off all metal particles. 60101877-B 55
-
 1
1 -
2
-
3
-
4
-
5
-
6
-
7
-
8
-
9
-
10
-
11
-
12
-
13
-
14
-
15
-
16
-
17
-
18
-
19
-
20
-
21
-
22
-
23
-
24
-
25
-
26
-
27
-
28
-
29
-
30
-
31
-
32
-
33
-
34
-
35
-
36
-
37
-
38
-
39
-
40
-
41
-
42
-
43
-
44
-
45
-
46
-
47
-
48
-
49
-
 50
50 -
 51
51 -
 52
52 -
 53
53 -
 54
54 -
 55
55 -
 56
56 -
 57
57 -
 58
58 -
 59
59 -
 60
60 -
61
-
62
-
63
-
64
-
65
-
66
-
67
-
68
-
69
-
70
-
71
-
72
-
73
-
74
-
75
-
76
-
77
-
78
-
79
-
80
-
81
-
82
-
83
-
84
-
85
-
86
-
87
-
88
 |
 |
