JVC GZ-EX210 User Manual - English - Page 103
Canceling Deleting Registered Face Information
 |
View all JVC GZ-EX210 manuals
Add to My Manuals
Save this manual to your list of manuals |
Page 103 highlights
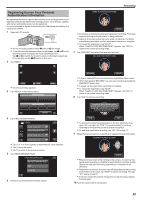
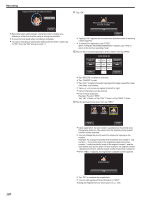
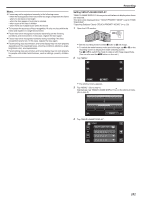
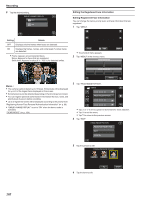
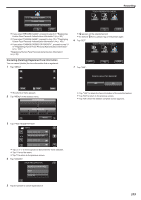
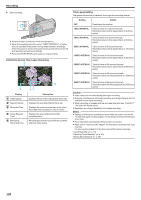
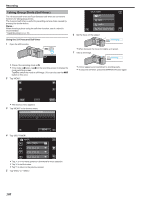
RECORD AGAIN CHANGE NAME CHANGE ORDER OF PRIORITY STOP . 0 If you select "RECORD AGAIN", proceed to step 6 in ""Registering Human Face Personal Authentication Information" (A p. 99) ". 0 If you select "CHANGE NAME", proceed to step 12 in ""Registering Human Face Personal Authentication Information" (A p. 100) ". 0 If you select "CHANGE ORDER OF PRIORITY", proceed to step 13 in ""Registering Human Face Personal Authentication Information" (A p. 100) ". "Registering Human Face Personal Authentication Information" (A p. 99) Canceling (Deleting) Registered Face Information You can cancel (delete) the face information that is registered. 1 Tap "MENU". TOUCH PERSON TO CANCEL JOHN MIKE KEN Recording STOP . 0 A appears on the selected person. 0 To remove A from a person, tap on the person again. 6 Tap "SET". TOUCH PERSON TO CANCEL JOHN MIKE KEN SET . 7 Tap "YES". STOP ˻PLAY REC . 0 The shortcut menu appears. 2 Tap "MENU" in the shortcut menu. MENU CANCEL SELECTED PERSON? YES NO . 0 Tap "YES" to delete the face information of the selected person. 0 Tap "NO" to return to the previous screen. 0 Tap "OK" when the deletion complete screen appears. . 3 Tap "FACE REGISTRATION". VIDEO MENU FACE REGISTRATION . 0 Tap 3 or 2 to move upward or downward for more selection. 0 Tap L to exit the menu. 0 Tap J to return to the previous screen. 4 Tap "CANCEL". FACE REGISTRATION REGISTER NEW FACE EDIT CANCEL . 5 Tap the person to cancel registration of. 103
-
 1
1 -
2
-
3
-
4
-
5
-
6
-
7
-
8
-
9
-
10
-
11
-
12
-
13
-
14
-
15
-
16
-
17
-
18
-
19
-
20
-
21
-
22
-
23
-
24
-
25
-
26
-
27
-
28
-
29
-
30
-
31
-
32
-
33
-
34
-
35
-
36
-
37
-
38
-
39
-
40
-
41
-
42
-
43
-
44
-
45
-
46
-
47
-
48
-
49
-
50
-
51
-
52
-
53
-
54
-
55
-
56
-
57
-
58
-
59
-
60
-
61
-
62
-
63
-
64
-
65
-
66
-
67
-
68
-
69
-
70
-
71
-
72
-
73
-
74
-
75
-
76
-
77
-
78
-
79
-
80
-
81
-
82
-
83
-
84
-
85
-
86
-
87
-
88
-
89
-
90
-
91
-
92
-
93
-
94
-
95
-
96
-
97
-
 98
98 -
 99
99 -
 100
100 -
 101
101 -
 102
102 -
 103
103 -
 104
104 -
 105
105 -
 106
106 -
 107
107 -
 108
108 -
109
-
110
-
111
-
112
-
113
-
114
-
115
-
116
-
117
-
118
-
119
-
120
-
121
-
122
-
123
-
124
-
125
-
126
-
127
-
128
-
129
-
130
-
131
-
132
-
133
-
134
-
135
-
136
-
137
-
138
-
139
-
140
-
141
-
142
-
143
-
144
-
145
-
146
-
147
-
148
-
149
-
150
-
151
-
152
-
153
-
154
-
155
-
156
-
157
-
158
-
159
-
160
-
161
-
162
-
163
-
164
-
165
-
166
-
167
-
168
-
169
-
170
-
171
-
172
-
173
-
174
-
175
-
176
-
177
-
178
-
179
-
180
-
181
-
182
-
183
-
184
-
185
-
186
-
187
-
188
-
189
-
190
-
191
-
192
-
193
-
194
-
195
-
196
-
197
-
198
-
199
-
200
-
201
-
202
-
203
-
204
-
205
-
206
-
207
-
208
-
209
-
210
-
211
-
212
-
213
-
214
-
215
 |
 |
