JVC GZ-EX210 User Manual - English - Page 104
Reducing Camera Shake, Slow-motion (High-speed) Recording, Setting, Details, ON AIS, Recording Speed
 |
View all JVC GZ-EX210 manuals
Add to My Manuals
Save this manual to your list of manuals |
Page 104 highlights
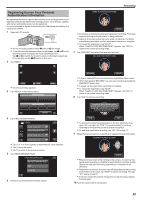
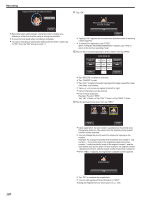
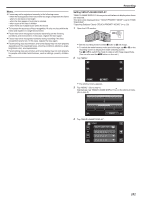
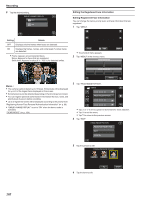
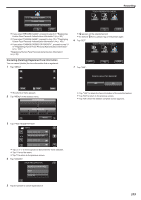
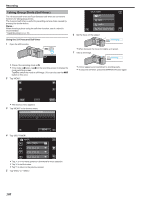
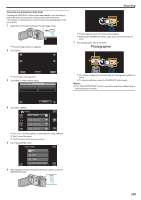
Recording Reducing Camera Shake When the image stabilizer is set, camera shake during video recording can be effectively reduced. 1 Open the LCD monitor. . 2 Press the a button to change the setting. . 0 The setting of image stabilizer changes with every press. Setting b OFF a ON r ON (AIS) Details Deactivates image stabilizer. Reduces camera shake under normal shooting conditions. Reduces camera shake more effectively when shooting bright scenes on the wide angle end. Only on the wide angle end (approx. 5x). (A video mode only) Memo : 0 It is recommended to set the image stabilizer to "OFF" when shooting a subject of little movement with the unit on a tripod. 0 Complete stabilization may not be possible if camera shake is excessive. 0 When "ON (AIS)" is set, the angle of view becomes narrower. 0 Image stabilization only starts when the SNAPSHOT button is pressed halfway during still image recording. Slow-motion (High-speed) Recording You can record videos in slow-motion by increasing the recording speed to emphasize the movements, and play back the slow-motion video smoothly. This is a handy function for checking movements, such as golf swings. Recording Speed 300 fps Image Size 720×480 Maximum Recording Time 120 m Maximum Playback Time 12 h Image Size when Connected to Monitor 1920×1080 0 The playback time will be 6 times of the actual recorded time. (Example: If the recorded time is 1 minute, the playback time will be 6 minutes.) 1 Open the LCD monitor. . 0 Check if the recording mode is A. 0 If the mode is B still image, tap B on the recording screen to display the mode switching screen. Tap A to switch the mode to video. (You can also use the A/B button on this unit.) 2 Tap "MENU". ˻PLAY REC . 0 The shortcut menu appears. 3 Tap "MENU" in the shortcut menu. MENU 104 . 4 Tap "HIGH SPEED RECORDING". VIDEO MENU HIGH SPEED RECORDING . 5 Tap "ON".
-
 1
1 -
2
-
3
-
4
-
5
-
6
-
7
-
8
-
9
-
10
-
11
-
12
-
13
-
14
-
15
-
16
-
17
-
18
-
19
-
20
-
21
-
22
-
23
-
24
-
25
-
26
-
27
-
28
-
29
-
30
-
31
-
32
-
33
-
34
-
35
-
36
-
37
-
38
-
39
-
40
-
41
-
42
-
43
-
44
-
45
-
46
-
47
-
48
-
49
-
50
-
51
-
52
-
53
-
54
-
55
-
56
-
57
-
58
-
59
-
60
-
61
-
62
-
63
-
64
-
65
-
66
-
67
-
68
-
69
-
70
-
71
-
72
-
73
-
74
-
75
-
76
-
77
-
78
-
79
-
80
-
81
-
82
-
83
-
84
-
85
-
86
-
87
-
88
-
89
-
90
-
91
-
92
-
93
-
94
-
95
-
96
-
97
-
98
-
 99
99 -
 100
100 -
 101
101 -
 102
102 -
 103
103 -
 104
104 -
 105
105 -
 106
106 -
 107
107 -
 108
108 -
 109
109 -
110
-
111
-
112
-
113
-
114
-
115
-
116
-
117
-
118
-
119
-
120
-
121
-
122
-
123
-
124
-
125
-
126
-
127
-
128
-
129
-
130
-
131
-
132
-
133
-
134
-
135
-
136
-
137
-
138
-
139
-
140
-
141
-
142
-
143
-
144
-
145
-
146
-
147
-
148
-
149
-
150
-
151
-
152
-
153
-
154
-
155
-
156
-
157
-
158
-
159
-
160
-
161
-
162
-
163
-
164
-
165
-
166
-
167
-
168
-
169
-
170
-
171
-
172
-
173
-
174
-
175
-
176
-
177
-
178
-
179
-
180
-
181
-
182
-
183
-
184
-
185
-
186
-
187
-
188
-
189
-
190
-
191
-
192
-
193
-
194
-
195
-
196
-
197
-
198
-
199
-
200
-
201
-
202
-
203
-
204
-
205
-
206
-
207
-
208
-
209
-
210
-
211
-
212
-
213
-
214
-
215
 |
 |
