JVC GZ-EX210 User Manual - English - Page 126
Capturing a Required Part in the Video (TRIMMING), How to Enable Seamless Video Recording Again
 |
View all JVC GZ-EX210 manuals
Add to My Manuals
Save this manual to your list of manuals |
Page 126 highlights
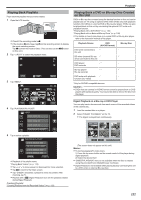
Editing COMBINE WITH THIS SCENE? THE ABOVE SCENE IS FOUND YES NO . 7 Tap the media to store to. Capturing a Required Part in the Video (TRIMMING) Select the required part of a video and save it as a new video file. 0 The original video remains in its existing location. 1 Open the LCD monitor. SELECT THE MEDIA TO STORE THE COMBINED SCENES BUILT-IN MEMORY SD CARD . 8 Tap "YES". . 0 Check if the recording mode is A. 0 If the mode is B still image, tap B on the recording screen to display the mode switching screen. Tap A to switch the mode to video. (You can also use the A/B button on this unit.) 2 Tap "
-
 1
1 -
2
-
3
-
4
-
5
-
6
-
7
-
8
-
9
-
10
-
11
-
12
-
13
-
14
-
15
-
16
-
17
-
18
-
19
-
20
-
21
-
22
-
23
-
24
-
25
-
26
-
27
-
28
-
29
-
30
-
31
-
32
-
33
-
34
-
35
-
36
-
37
-
38
-
39
-
40
-
41
-
42
-
43
-
44
-
45
-
46
-
47
-
48
-
49
-
50
-
51
-
52
-
53
-
54
-
55
-
56
-
57
-
58
-
59
-
60
-
61
-
62
-
63
-
64
-
65
-
66
-
67
-
68
-
69
-
70
-
71
-
72
-
73
-
74
-
75
-
76
-
77
-
78
-
79
-
80
-
81
-
82
-
83
-
84
-
85
-
86
-
87
-
88
-
89
-
90
-
91
-
92
-
93
-
94
-
95
-
96
-
97
-
98
-
99
-
100
-
101
-
102
-
103
-
104
-
105
-
106
-
107
-
108
-
109
-
110
-
111
-
112
-
113
-
114
-
115
-
116
-
117
-
118
-
119
-
120
-
 121
121 -
 122
122 -
 123
123 -
 124
124 -
 125
125 -
 126
126 -
 127
127 -
 128
128 -
 129
129 -
 130
130 -
 131
131 -
132
-
133
-
134
-
135
-
136
-
137
-
138
-
139
-
140
-
141
-
142
-
143
-
144
-
145
-
146
-
147
-
148
-
149
-
150
-
151
-
152
-
153
-
154
-
155
-
156
-
157
-
158
-
159
-
160
-
161
-
162
-
163
-
164
-
165
-
166
-
167
-
168
-
169
-
170
-
171
-
172
-
173
-
174
-
175
-
176
-
177
-
178
-
179
-
180
-
181
-
182
-
183
-
184
-
185
-
186
-
187
-
188
-
189
-
190
-
191
-
192
-
193
-
194
-
195
-
196
-
197
-
198
-
199
-
200
-
201
-
202
-
203
-
204
-
205
-
206
-
207
-
208
-
209
-
210
-
211
-
212
-
213
-
214
-
215
 |
 |

.
NO
YES
COMBINE WITH THIS SCENE?
THE ABOVE SCENE IS FOUND
7
Tap the media to store to.
.
SD CARD
BUILT-IN MEMORY
THE COMBINED SCENES
SELECT THE MEDIA TO STORE
8
Tap “YES”.
.
NO
YES
START COMBINING THE SCENES?
0
Combining of the videos starts.
0
After videos are combined, tap “OK”.
Memo :
0
Seamless videos cannot be combined if there is not enough free space in
the built-in memory or SD card. Check the amount of remaining free space
before combining.
How to Enable Seamless Video Recording Again
To start seamless recording again after the previous session is complete, it
is necessary to combine seamless videos, or delete the combination
information of the seamless videos.
To delete the combination information of seamless videos, select “DEL
COMBINED SCENES” in step 5.
Capturing a Required Part in the Video
(TRIMMING)
Select the required part of a video and save it as a new video file.
0
The original video remains in its existing location.
1
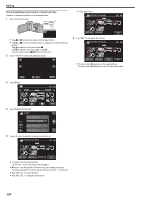
Open the LCD monitor.
.
0
Check if the recording mode is
A
.
0
If the mode is
B
still image, tap
B
on the recording screen to display
the mode switching screen.
Tap
A
to switch the mode to video. (You can also use the
A
/
B
button
on this unit.)
2
Tap “<<PLAY” to select the playback mode.
.
≪
PLAY
REC
MENU
3
Tap “MENU”.
.
≪
REC
MENU
4
Tap “TRIMMING”.
.
TRIMMING
VIDEO
5
Tap the video to edit.
.
STOP
TRIMMING
6
Tap
e
to pause playback at the desired start point, then tap “A”.
Editing
126