JVC GZ-EX210 User Manual - English - Page 190
Clock Adjust, Date Display Style, Language, Monitor Brightness
 |
View all JVC GZ-EX210 manuals
Add to My Manuals
Save this manual to your list of manuals |
Page 190 highlights
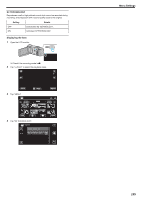
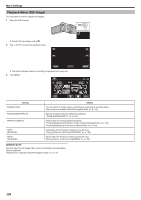
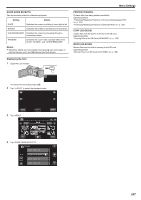
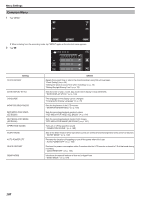
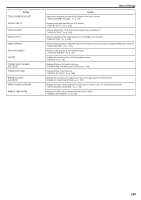
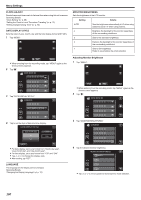
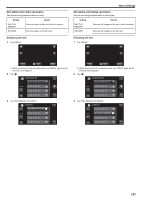
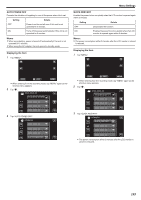
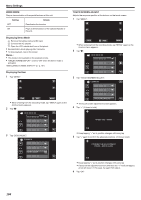
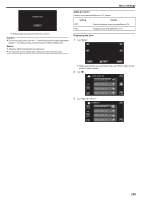
Menu Settings CLOCK ADJUST Resets the current time or sets to the local time when using this unit overseas. Operating Details "Clock Setting" (A p. 68) "Setting the Clock to Local Time when Traveling" (A p. 72) "Setting Daylight Saving Time" (A p. 72) DATE DISPLAY STYLE Sets the order of year, month, day and the time display format (24H/12H). 1 Tap "MENU". MONITOR BRIGHTNESS Sets the brightness of the LCD monitor. Setting Details AUTO Sets the brightness automatically to "4" when using outdoors and to "3" when using indoors. 4 Brightens the backlight of the monitor regardless of the surrounding conditions. 3 Sets to the standard brightness. 2 Darkens the backlight of the monitor regardless of the surrounding conditions. 1 Sets to dim brightness. Helps to save battery life when selected. ˻PLAY REC MENU . 0 When entering from the recording mode, tap "MENU" again as the shortcut menu appears. 2 Tap "Q". Adjusting Monitor Brightness 1 Tap "MENU". . 3 Tap "DATE DISPLAY STYLE". COMMON DATE DISPLAY STYLE . 4 Tap to set the style of date and time display. DATE DISPLAY STYLE year.month.day TIME 12h SET . 0 For date display, set to any format from "month.day.year", "year.month.day", and "day.month.year". 0 For time display, set to any format from "12h" and "24h". 0 Tap 3 or 2 to change the display style. 0 After setting, tap "SET". LANGUAGE The language on the display can be changed. Operating Details "Changing the Display Language" (A p. 70) ˻PLAY REC MENU . 0 When entering from the recording mode, tap "MENU" again as the shortcut menu appears. 2 Tap "Q". . 3 Tap "MONITOR BRIGHTNESS". COMMON MONITOR BRIGHTNESS . 4 Tap the desired monitor brightness. MONITOR BRIGHTNESS AUTO 4 3 2 . 0 Tap 3 or 2 to move upward or downward for more selection. 190
-
 1
1 -
2
-
3
-
4
-
5
-
6
-
7
-
8
-
9
-
10
-
11
-
12
-
13
-
14
-
15
-
16
-
17
-
18
-
19
-
20
-
21
-
22
-
23
-
24
-
25
-
26
-
27
-
28
-
29
-
30
-
31
-
32
-
33
-
34
-
35
-
36
-
37
-
38
-
39
-
40
-
41
-
42
-
43
-
44
-
45
-
46
-
47
-
48
-
49
-
50
-
51
-
52
-
53
-
54
-
55
-
56
-
57
-
58
-
59
-
60
-
61
-
62
-
63
-
64
-
65
-
66
-
67
-
68
-
69
-
70
-
71
-
72
-
73
-
74
-
75
-
76
-
77
-
78
-
79
-
80
-
81
-
82
-
83
-
84
-
85
-
86
-
87
-
88
-
89
-
90
-
91
-
92
-
93
-
94
-
95
-
96
-
97
-
98
-
99
-
100
-
101
-
102
-
103
-
104
-
105
-
106
-
107
-
108
-
109
-
110
-
111
-
112
-
113
-
114
-
115
-
116
-
117
-
118
-
119
-
120
-
121
-
122
-
123
-
124
-
125
-
126
-
127
-
128
-
129
-
130
-
131
-
132
-
133
-
134
-
135
-
136
-
137
-
138
-
139
-
140
-
141
-
142
-
143
-
144
-
145
-
146
-
147
-
148
-
149
-
150
-
151
-
152
-
153
-
154
-
155
-
156
-
157
-
158
-
159
-
160
-
161
-
162
-
163
-
164
-
165
-
166
-
167
-
168
-
169
-
170
-
171
-
172
-
173
-
174
-
175
-
176
-
177
-
178
-
179
-
180
-
181
-
182
-
183
-
184
-
 185
185 -
 186
186 -
 187
187 -
 188
188 -
 189
189 -
 190
190 -
 191
191 -
 192
192 -
 193
193 -
 194
194 -
 195
195 -
196
-
197
-
198
-
199
-
200
-
201
-
202
-
203
-
204
-
205
-
206
-
207
-
208
-
209
-
210
-
211
-
212
-
213
-
214
-
215
 |
 |
