Jenn-Air JGS9900CDS Installation Instruction - Page 14
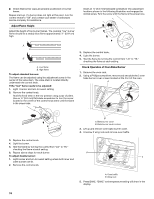
View from Motor Side of Blower, Top View - downdraft gas range
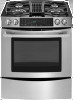 |
View all Jenn-Air JGS9900CDS manuals
Add to My Manuals
Save this manual to your list of manuals |
Page 14 highlights
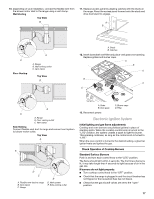
4. Remove 4 locknuts on the motor side of the blower and remove the bracket. View from Motor Side of Blower 7. Remove the bracket from the other side of the blower motor, rotate 90° and secure with 4 locknuts. A A. Electrical connector 5. Lift and rotate the motor 180° to reposition the electrical connection. A 8. Mount blower motor to floor using 4 - #8 x ¾" hex head screws provided. NOTE: Vent system will be connected after range has been moved into its final location. See the "Connect Range to Downdraft System" section. Top View B A C A. Electrical connector 6. Rotate bracket 90° and secure with 4 locknuts. A. 2⁷⁄₈" (7.3 cm) from back wall to edge of bracket B. Mounting bracket C. Blower 9. Go to the "Make Gas Connection" section. 14
-
 1
1 -
2
-
3
-
4
-
5
-
6
-
7
-
8
-
 9
9 -
 10
10 -
 11
11 -
 12
12 -
 13
13 -
 14
14 -
 15
15 -
 16
16 -
 17
17 -
 18
18 -
 19
19 -
20
-
21
-
22
-
23
-
24
-
25
-
26
-
27
-
28
-
29
-
30
-
31
-
32
-
33
-
34
-
35
-
36
-
37
-
38
-
39
-
40
-
41
-
42
-
43
-
44
-
45
-
46
-
47
-
48
-
49
-
50
-
51
-
52
-
53
-
54
-
55
-
56
 |
 |

14
4.
Remove 4 locknuts on the motor side of the blower and
remove the bracket.
5.
Lift and rotate the motor 180° to reposition the electrical
connection.
6.
Rotate bracket 90° and secure with 4 locknuts.
7.
Remove the bracket from the other side of the blower motor,
rotate 90° and secure with 4 locknuts.
8.
Mount blower motor to floor using 4 - #8 x ¾" hex head
screws provided.
NOTE:
Vent system will be connected after range has been
moved into its final location. See the “Connect Range to
Downdraft System” section.
9.
Go to the “Make Gas Connection” section.
View from Motor Side of Blower
A. Electrical connector
A. Electrical connector
A
A
Top View
A. 2
⁷⁄₈
" (7.3
cm) from back
wall to edge of bracket
B. Mounting bracket
C. Blower
A
B
C