Jenn-Air JGS9900CDS Installation Instruction - Page 16
Connect Range to Downdraft System
 |
View all Jenn-Air JGS9900CDS manuals
Add to My Manuals
Save this manual to your list of manuals |
Page 16 highlights
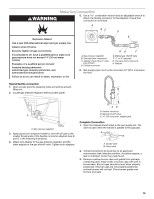
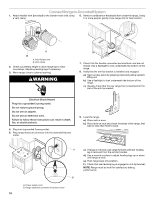
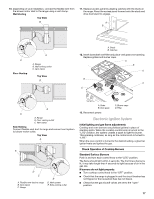
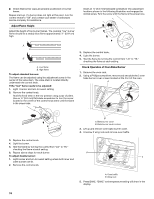
Connect Range to Downdraft System 1. Attach flexible vent (provided) to the blower motor inlet using a vent clamp. 6. Remove cardboard or hardboard from under the range. Using 2 or more people, gently move range into its final location. 1 2 A B A. Inlet flexible vent B. Vent clamp 2. Check countertop height to allow range top to clear countertop. Adjusting leveling legs if necessary. 3. Move range close to cabinet opening. WARNING 1 7. Check that the flexible connector and electrical cord are not kinked. Use a flashlight to look underneath the bottom of the range. 8. Verify that the anti-tip bracket is installed and engaged. a.) Open access panel by grasping sides and pulling upward, lifting out. b.) Use a flashlight to look underneath the bottom of the range. c.) Visually check that the rear range foot is inserted into the slot of the anti-tip bracket. Electrical Shock Hazard Plug into a grounded 3 prong outlet. Do not remove ground prong. Do not use an adapter. Do not use an extension cord. Failure to follow these instructions can result in death, fire, or electrical shock. 4. Plug into a grounded 3 prong outlet. 5. Plug range electrical connector into the downdraft blower motor. 9. Level the range. a.) Place rack in oven. b.) Place level on rack and check levelness of the range, first side to side; then front to back. A c.) If range is not level, pull range forward until rear leveling leg is removed from the anti-tip bracket. d.) Use a wrench or pliers to adjust leveling legs up or down until range is level. e.) Push range back into position. f.) Check that rear leveling leg is engaged in anti-tip bracket. NOTE: Range must be level for satisfactory baking performance. B A. Power supply cord B. Range electrical connector to blower motor 16
-
 1
1 -
2
-
3
-
4
-
5
-
6
-
7
-
8
-
9
-
10
-
 11
11 -
 12
12 -
 13
13 -
 14
14 -
 15
15 -
 16
16 -
 17
17 -
 18
18 -
 19
19 -
 20
20 -
 21
21 -
22
-
23
-
24
-
25
-
26
-
27
-
28
-
29
-
30
-
31
-
32
-
33
-
34
-
35
-
36
-
37
-
38
-
39
-
40
-
41
-
42
-
43
-
44
-
45
-
46
-
47
-
48
-
49
-
50
-
51
-
52
-
53
-
54
-
55
-
56
 |
 |
