Jenn-Air JGS9900CDS Installation Instruction - Page 20
Gas Conversions - review
 |
View all Jenn-Air JGS9900CDS manuals
Add to My Manuals
Save this manual to your list of manuals |
Page 20 highlights
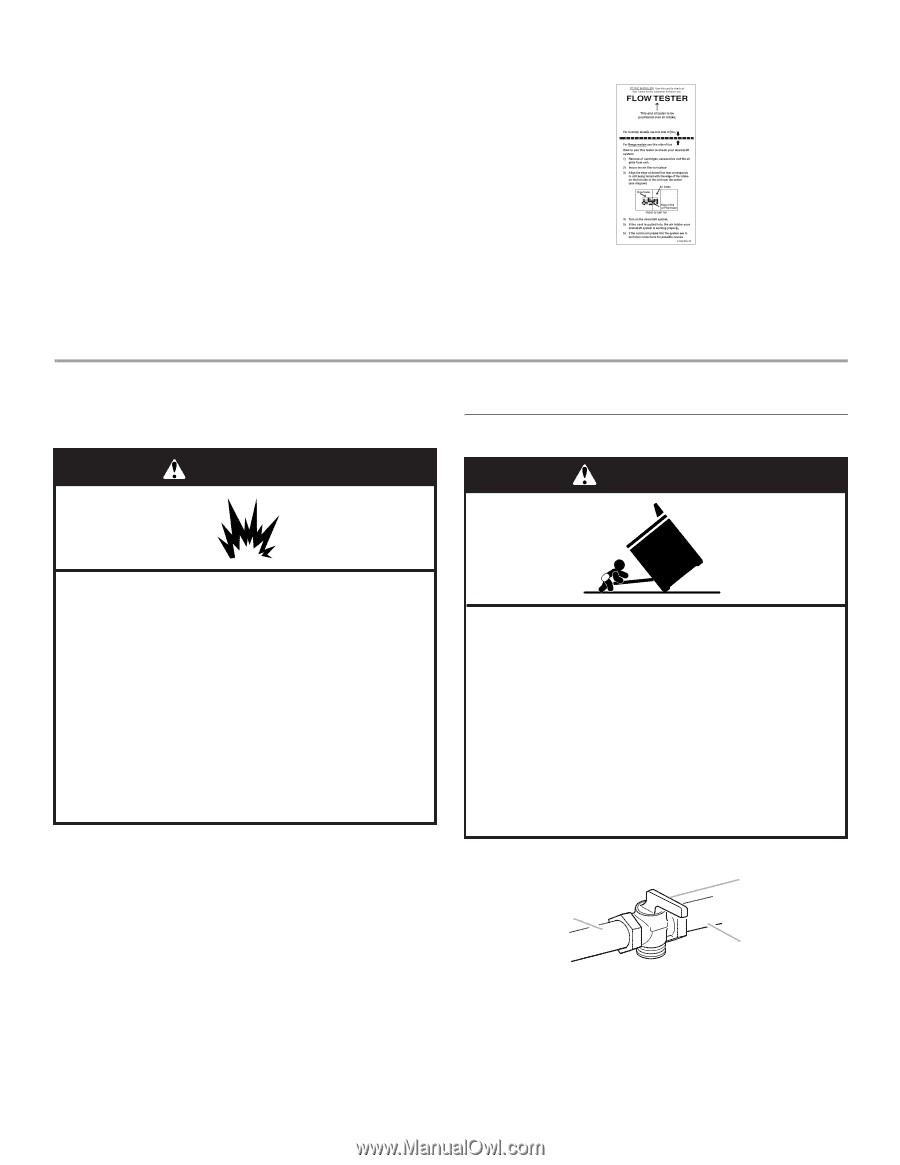
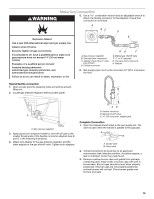
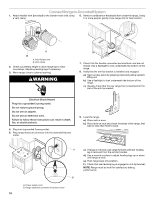
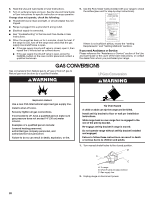
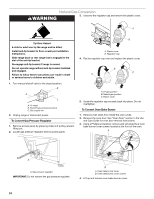
6. Read the Use and Care Guide or User Instructions. 7. Turn on surface burners and oven. See the Use and Care Guide or User Instructions for specific instruction on range operation. If range does not operate, check the following: ■ Household fuse is intact and tight, or circuit breaker has not tripped. ■ Range is plugged into a grounded 3 prong outlet. ■ Electrical supply is connected. ■ See "Troubleshooting" in the Use and Care Guide or User Instructions. 8. When the range has been on for 5 minutes, check for heat. If the range is cold, turn off the range and check that the gas supply line shutoff valve is open. ■ If the gas supply line shutoff valve is closed, open it, then repeat the 5-minute test as outlined above. ■ If the gas supply line shutoff valve is open, press the CANCEL button on the oven control panel and contact a qualified technician. 9. Use the Flow Tester Card provided with your range to check the airflow (see card for step-by-step instructions). If there is not sufficient airflow, review the "Venting Requirements" and "Venting Methods" sections. If you need Assistance or Service: Please reference the "Assistance or Service" section of the Use and Care Guide or the cover of the User Instructions, or contact the dealer from whom you purchased your range. GAS CONVERSIONS Gas conversions from Natural gas to LP gas or from LP gas to Natural gas must be done by a qualified installer. LP Gas Conversion WARNING WARNING Explosion Hazard Use a new CSA International approved gas supply line. Install a shut-off valve. Securely tighten all gas connections. If connected to LP, have a qualified person make sure gas pressure does not exceed 14" (36 cm) water column. Examples of a qualified person include: licensed heating personnel, authorized gas company personnel, and authorized service personnel. Failure to do so can result in death, explosion, or fire. Tip Over Hazard A child or adult can tip the range and be killed. Install anti-tip bracket to floor or wall per installation instructions. Slide range back so rear range foot is engaged in the slot of the anti-tip bracket. Re-engage anti-tip bracket if range is moved. Do not operate range without anti-tip bracket installed and engaged. Failure to follow these instructions can result in death or serious burns to children and adults. 1. Turn manual shutoff valve to the closed position. B A C A. To range B. Shutoff valve (closed position) C. Gas supply line 2. Unplug range or disconnect power. 20
-
 1
1 -
2
-
3
-
4
-
5
-
6
-
7
-
8
-
9
-
10
-
11
-
12
-
13
-
14
-
 15
15 -
 16
16 -
 17
17 -
 18
18 -
 19
19 -
 20
20 -
 21
21 -
 22
22 -
 23
23 -
 24
24 -
 25
25 -
26
-
27
-
28
-
29
-
30
-
31
-
32
-
33
-
34
-
35
-
36
-
37
-
38
-
39
-
40
-
41
-
42
-
43
-
44
-
45
-
46
-
47
-
48
-
49
-
50
-
51
-
52
-
53
-
54
-
55
-
56
 |
 |