Jenn-Air JGS9900CDS Installation Instruction - Page 17
Electronic Ignition System - control panel
 |
View all Jenn-Air JGS9900CDS manuals
Add to My Manuals
Save this manual to your list of manuals |
Page 17 highlights
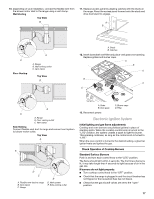
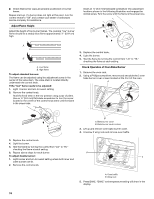
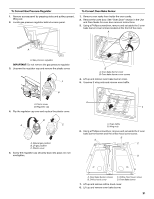
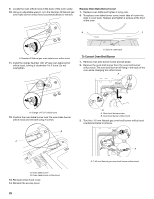
10. Depending on your installation, connect the flexible vent from the blower motor inlet to the range using a vent clamp. Wall Venting Top View B 11. Replace access panel by aligning catches with the studs on the range. Press the access panel forward onto the studs and drop downward to engage. A B C Floor Venting A A. Range B. Wall venting outlet C. Vent clamp Top View B A. Studs B. Catches 12. Insert downdraft vent filter and place vent grate over opening. Replace grates and burner caps. A B A D C C A C A. Range B. Floor venting outlet C. Vent clamp Side Venting Connect flexible vent duct to range and connect vent system to blower motor outlet. Top View A E BLOWER D C A. Flexible vent duct to range B. Vent clamp C. Range B D. Vent system E. Side venting outlet A. Grate B. Vent grate 13. Reconnect power. C. Burner caps D. Filter Electronic Ignition System Initial lighting and gas flame adjustments Cooktop and oven burners use pilotless igniters in place of standing pilots. When the cooktop control knob is turned to the "LITE" position, the system creates a spark to light the burner. This sparking continues, as long as the control knob is turned to "LITE." When the oven control is turned to the desired setting, a glow bar igniter heats and ignites the gas. Check Operation of Cooktop Burners Standard Surface Burners Push in and turn each control knob to the "LITE" position. The flame should light within 4 seconds. The first time a burner is lit, it may take longer than 4 seconds to light because of air in the gas line. If burners do not light properly: ■ Turn cooktop control knob to the "OFF" position. ■ Check that the range is plugged in and the circuit breaker has not tripped or the household fuse has not blown. ■ Check that the gas shutoff valves are set to the "open" position. 17
-
 1
1 -
2
-
3
-
4
-
5
-
6
-
7
-
8
-
9
-
10
-
11
-
 12
12 -
 13
13 -
 14
14 -
 15
15 -
 16
16 -
 17
17 -
 18
18 -
 19
19 -
 20
20 -
 21
21 -
 22
22 -
23
-
24
-
25
-
26
-
27
-
28
-
29
-
30
-
31
-
32
-
33
-
34
-
35
-
36
-
37
-
38
-
39
-
40
-
41
-
42
-
43
-
44
-
45
-
46
-
47
-
48
-
49
-
50
-
51
-
52
-
53
-
54
-
55
-
56
 |
 |
