Jenn-Air JGS9900CDS Installation Instruction - Page 26
To Convert Oven Broil Burner, To Convert Surface Burners
 |
View all Jenn-Air JGS9900CDS manuals
Add to My Manuals
Save this manual to your list of manuals |
Page 26 highlights
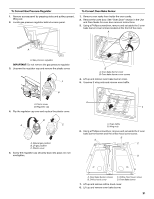
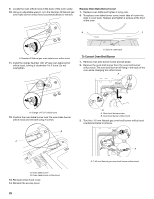
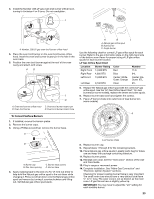
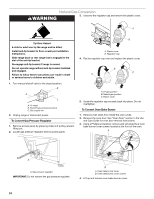
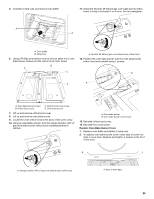
To Convert Oven Broil Burner 1. Remove oven broil burner screw and set aside. 2. Remove the oven broil burner from the oven broil burner orifice hood. The oven broil burner will hang in the back of the oven while changing the orifice hood. A 6. Position the oven broil burner against the roof of the oven cavity and attach with screw. AB B A. Oven broil burner screw B. Oven broil burner orifice hood 3. Turn the Number .038 LP gas oven broil burner orifice hood counterclockwise to remove. A C D A. Oven broil burner orifice hood C. Oven broil burner locator pin B. Oven broil burner D. Oven broil burner locator hole To Convert Surface Burners 1. If they are installed, remove the burner grates. 2. Remove the burner caps. 3. On models with a dual burner, remove the LP choke from the dual burner. 4. Using a Phillips screwdriver, remove the burner base. A C B D A. Number .038 LP gas oven broil burner orifice hood 4. Install the 1.42 mm Natural gas oven broil burner orifice hood, turning it clockwise 4 or 5 turns. Do not overtighten. 1.42 A A. Burner cap C. Burner base screws B. Gas tube opening D. Burner base 5. Apply masking tape to the end of a 7 mm) nut driver to help hold the LP gas orifice spud in the nut driver while changing it. Press nut driver down onto the LP gas orifice spud and remove by turning it counterclockwise and lifting out. Set the LP gas orifice spud aside. A. 1.42 mm Natural gas oven broil burner orifice hood 5. Place the oven broil burner on the oven broil burner orifice hood. Insert the oven broil burner locator pin in the hole in the oven back. 26 A B C A. Natural gas orifice spud B. Dual burner C. Single burner
-
 1
1 -
2
-
3
-
4
-
5
-
6
-
7
-
8
-
9
-
10
-
11
-
12
-
13
-
14
-
15
-
16
-
17
-
18
-
19
-
20
-
 21
21 -
 22
22 -
 23
23 -
 24
24 -
 25
25 -
 26
26 -
 27
27 -
 28
28 -
 29
29 -
 30
30 -
 31
31 -
32
-
33
-
34
-
35
-
36
-
37
-
38
-
39
-
40
-
41
-
42
-
43
-
44
-
45
-
46
-
47
-
48
-
49
-
50
-
51
-
52
-
53
-
54
-
55
-
56
 |
 |
