Kenwood XD-355 User Manual 1 - Page 11
Setting The Clock
 |
View all Kenwood XD-355 manuals
Add to My Manuals
Save this manual to your list of manuals |
Page 11 highlights
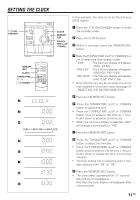
SETTING THE CLOCK ON/ STANDBY MEMORY /SET CLOCK TUNING/TIME (fi %) POWER 2 3 4 5 6 7 8 9 In this example, the clock is set for the 24 hours (0:00) system. CLOCK MEMORY /SET TUNING/ TIME (%UP fiDOWN) 1 Press the ON/STANDBY button to enter the standby mode. 2 Press the CLOCK button. 3 Within 5 seconds, press the MEMORY/SET button. 4 Press theTUNING/TIME (%UP or fiDOWN) but- ton to select the time display mode. "0:00" :The 24-hours display will appear. (0:00 - 23:59) "AM 0:00" :The 12-hours display will appear. (AM 0:00 - PM 11:59) "AM 12:00" :The 12-hours display will appear. (AM 12:00 - PM 11:59) • Note that this can only be set when the unit is first installed or it has been reset (see page 37 - RESETTING THE MICROCOMPUTER). 5 Press the MEMORY/SET button. 6 Press the TUNING/TIME (%UP or fiDOWN) button to adjust the hour. • Press the TUNING/TIME (%UP or fiDOWN) button once to advance the time by 1 hour. Hold it down to advance continuously. • When the 12-hours display is selected, "AM" will change automatically to "PM" 7 Press the MEMORY/SET button. 8 Press the TUNING/TIME (%UP or fiDOWN) button to adjust the minutes. • Press the TUNING/TIME (%UP or fiDOWN) button once to advance the time by 1 minute. Hold it down to change the time in 5 minutes intervals. • The hour setting will not advance even if min- utes advance from "59" to "00". 9 Press the MEMORY/SET button. • The clock starts operating from "0" second. (Second are not displayed.) And then the clock display will disappear after a few seconds. 11 EN
-
 1
1 -
2
-
3
-
4
-
5
-
 6
6 -
 7
7 -
 8
8 -
 9
9 -
 10
10 -
 11
11 -
 12
12 -
 13
13 -
 14
14 -
 15
15 -
 16
16 -
17
-
18
-
19
-
20
-
21
-
22
-
23
-
24
-
25
-
26
-
27
-
28
-
29
-
30
-
31
-
32
-
33
-
34
-
35
-
36
-
37
-
38
-
39
-
40
 |
 |
