Kenwood XD-355 User Manual 1 - Page 34
Timer Recording, Tuner, Standby, Tuner Band, Power, Timer, Memory, Volume, Control, Tuning
 |
View all Kenwood XD-355 manuals
Add to My Manuals
Save this manual to your list of manuals |
Page 34 highlights
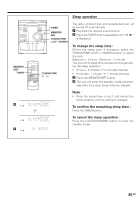
STANDBY/TIMER ON/ STANDBY VIDEO /AUX TUNER (BAND) MEMORY /SET TIMER TUNER (BAND) POWER 3 REC 4 REC REC 5 REC Timer recording TIMER MEMORY/ SET VOLUME CONTROL TUNING/ TIME (%UP fiDOWN) TUNING/TIME (fi %) VIDEO / AUX VOLUME 1 Press the ON/STANDBY button to turn the power on. • Load a cassettle for recording into the TAPE B cassette compartment. 2 Press the TUNER (BAND) or VIDEO/AUX button to select the desired function, and then adjust the sound volume using the VOLUME CON- TROL. 3 Press the TIMER button repeatedly until " REC" is displayed. 4 Press the TUNING/TIME (%UP or fiDOWN) but- ton to set the hour start time, then press the MEMORY/SET button. 5 Press the TUNING/TIME (%UP or fiDOWN) but- ton to set the minute start time, then press the MEMORY/SET button. • The unit will enter the standby mode automati- cally, and the STANDBY/TIMER indicator will light up. 6 When the preset time is reached, the timer re- cording will start. • The volume will increase gradually. 7 When the recording tape reaches its end, the timer recording will end, and the unit will enter the standby mode. To cancel timer operation : Press the ON/STANDBY button to turn the power on. To change the programmed contents : Start again from step 1. Note : • Once the time is set, the setting will be retained until a new time is entered. 34 EN
-
 1
1 -
2
-
3
-
4
-
5
-
6
-
7
-
8
-
9
-
10
-
11
-
12
-
13
-
14
-
15
-
16
-
17
-
18
-
19
-
20
-
21
-
22
-
23
-
24
-
25
-
26
-
27
-
28
-
 29
29 -
 30
30 -
 31
31 -
 32
32 -
 33
33 -
 34
34 -
 35
35 -
 36
36 -
 37
37 -
 38
38 -
 39
39 -
40
 |
 |
