Kenwood XD-355 User Manual 1 - Page 31
RECORDING (TAPE B only), Recording from the built-in radio
 |
View all Kenwood XD-355 manuals
Add to My Manuals
Save this manual to your list of manuals |
Page 31 highlights
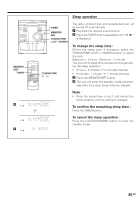
RECORDING (TAPE B only) • When recording important selections, be sure to make a preliminary test to ensure that the desired material is being properly recorded. • The volume and sound quality can be adjusted with no effect on the recorded signals (Variable Sound Monitor). • Metal and CrO2 tapes should not be used for recording or dubbing. Recording from the built-in radio 4 7 STOP 1 Tune in to the desired station. (see pages 19 - 21) 2 Load a cassette into the TAPE B cassette com- partment. 3 Press the REC PAUSE button • "REC." and "¶ 2 3" will flash. 4 Press the 2 or 3 button. 3 • "REC." will disappear and "¶ 2 or ¶ 3" will light up. Note : • If a whistling noise is heard whilst recording from an AM station, move the AM loop antenna to a 2 position where noise is no longer heard from the unit. To stop recording : Press the 7 STOP button. 1 2 5 7 STOP 4 3 Recording from the built-in CD player (CD Synchronised Recroding System) 1 Press the ON/STANDBY button to turn the power on. 2 Press the CD button and load the desired disc. • Use the program playback function to store the tracks you want to record in memory. (see page 18) 3 Load a cassette into the TAPE B cassette com- partment. 4 Press the REC PAUSE button. • "SYNC." and "¶ 2 3" will flash. 5 Press the 2 or 3 button. • "SYNC." will disappear and "¶ 2 or ¶ 3" will light up. • CD playback will start approximately 5 seconds after the tape starts To stop recording Press the 7 STOP button. The CD and tape will stop. 31 EN
-
 1
1 -
2
-
3
-
4
-
5
-
6
-
7
-
8
-
9
-
10
-
11
-
12
-
13
-
14
-
15
-
16
-
17
-
18
-
19
-
20
-
21
-
22
-
23
-
24
-
25
-
 26
26 -
 27
27 -
 28
28 -
 29
29 -
 30
30 -
 31
31 -
 32
32 -
 33
33 -
 34
34 -
 35
35 -
 36
36 -
37
-
38
-
39
-
40
 |
 |
