KitchenAid KGRA806PSS Use and Care Guide
KitchenAid KGRA806PSS - ARCHITECT Series: 30'' Gas Range Manual
 |
View all KitchenAid KGRA806PSS manuals
Add to My Manuals
Save this manual to your list of manuals |
KitchenAid KGRA806PSS manual content summary:
- KitchenAid KGRA806PSS | Use and Care Guide - Page 1
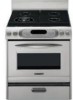
GAS RANGE Use & Care Guide For questions about features, operation/performance, parts accessories or service, call: 1-800-422-1230 In Canada, call for assistance 1-800-461-5681, for installation and service, call: 1-800-807-6777 or visit our website at... www.kitchenaid.com or www.KitchenAid.ca - KitchenAid KGRA806PSS | Use and Care Guide - Page 2
19 Convect Full Meal 19 Sabbath Mode 19 Proofing Bread 20 Timed Cooking 21 RANGE CARE 21 Self-Cleaning Cycle 21 General Cleaning 22 Oven Light(s 23 Storage Drawer 23 Oven Door 23 TROUBLESHOOTING 24 ASSISTANCE OR SERVICE 26 WARRANTY 27 TABLE DES MATIÈRES SÉCURITÉ DE LA CUISINIÈRE 28 La - KitchenAid KGRA806PSS | Use and Care Guide - Page 3
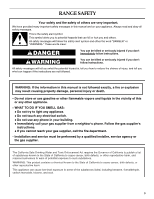
. • Immediately call your gas supplier from a neighbor's phone. Follow the gas supplier's instructions. • If you cannot reach your gas supplier, call the fire department. - Installation and service must be performed by a qualified installer, service agency or the gas supplier. The California Safe - KitchenAid KGRA806PSS | Use and Care Guide - Page 4
s Storage in or on the Range - Flammable materials s Proper Installation - The range, when installed, must should not be stored in an oven or near surface units. be electrically grounded in accordance with local s Top burner flame size should be adjusted so it does codes or, in the absence of - KitchenAid KGRA806PSS | Use and Care Guide - Page 5
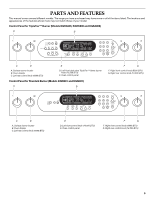
PARTS AND FEATURES This manual covers several different models. The range you have purchased may have some or all of the items listed. The locations and appearances of the features shown here may not match those of your model. Control Panel for TripleTier™ Burner (Models KGRA806, KGRK806 and - KitchenAid KGRA806PSS | Use and Care Guide - Page 6
G. Right rear surface burner & grate H. Right front surface burner & grate I. Control panel J. Door gasket K. Automatic oven light switch L. Broil burner with electric element (not shown) M. Bake burner & cover (not shown) Parts and Features not shown (on some models) Oven door window Broiler pan - KitchenAid KGRA806PSS | Use and Care Guide - Page 7
with your new range. Models with the TripleTier™ Flame Burner will include a TripleTier™ L.P. Gas Conversion Kit and a kit for standard ranges. See "Installation Instructions" for details on making this conversion. Electric igniters automatically light the surface burners when control knobs are - KitchenAid KGRA806PSS | Use and Care Guide - Page 8
between SIMMER BURNER HI and SIMMER BURNER LO. Large, Medium and Small Burner Controls OFF Med NOTE: Settings are marked on the control knob. All of the burner controls provide a range of cooking settings from HI to LO. The large standard burner (14,000 BTU [British Thermal Units]) provides - KitchenAid KGRA806PSS | Use and Care Guide - Page 9
) D. Support guides The TripleTier™ Flame Burner with InstaWok™ Ring is a multifunction burner that produces everything from a rapid boil down to a low simmer. The TripleTier™ Flame Burner with InstaWok™ Ring is functioned by a dual valve control knob, which controls two separate burners. See - KitchenAid KGRA806PSS | Use and Care Guide - Page 10
. Do not enlarge or distort the port. Do not use a wooden toothpick. If the burner needs to be adjusted, contact a trained repair specialist. Gas tube opening Gas must flow freely throughout the gas tube opening for the burner to light properly. Keep this area free of soil and do not allow spills - KitchenAid KGRA806PSS | Use and Care Guide - Page 11
display F. Clock/time of day display Style 2 (Models KGRI801 and KGSI901) G. Number pads H. Options selection pad I. Self-clean J. Cook time (length of cooking time) K. Stop time B C N L. Timer M. Clock set/start N. Oven light ON/OFF O. Off P. Start (control lock) D OP E AM 325˚ 350˚ 400˚ 425 - KitchenAid KGRA806PSS | Use and Care Guide - Page 12
inactive mode (blank) and the programmed function will be canceled. Control Lock The Control Lock shuts down the control panel pads to prevent unintended use of the oven. The Control Lock is preset unlocked, but can be locked. When the control is locked, only the TIMER SET/START and TIMER OFF pads - KitchenAid KGRA806PSS | Use and Care Guide - Page 13
oven bottom finish. s On those models with bottom vents, do not block or cover the oven a guide. oven. s May need to increase baking time. Stainless steel s Light, golden crusts s Uneven browning s May need to increase baking time. Stoneware s Crisp crusts s Follow manufacturer's instructions - KitchenAid KGRA806PSS | Use and Care Guide - Page 14
some models) WARNING Burn Hazard Use an oven mitt to remove temperature probe. Do not touch broil element. Failure to follow these instructions can fat or bone at an angle as shown in following diagram. Place food in oven and connect the temperature probe to the jack. Keep probe as far away - KitchenAid KGRA806PSS | Use and Care Guide - Page 15
chart as a guide. NUMBER OF PAN(S) POSITION ON RACK 1 Center of rack. 2 Side by side or slightly staggered. 3 or 4 Opposite corners on each rack. Make sure that no bakeware piece is directly over another. Oven Half-Rack with Removable Insert (on some models) B A Traditional Cooking - KitchenAid KGRA806PSS | Use and Care Guide - Page 16
broil element will cycle on and off in intervals to maintain oven temperature. If the oven door is opened during baking or roasting, the broil element will turn off immediately and the bake burner will turn off in 30 seconds to 2 minutes. They will come back on once the door is closed. To Bake - KitchenAid KGRA806PSS | Use and Care Guide - Page 17
models) In a convection oven, the fan-circulated hot air continually distributes heat more evenly than the natural movement of air in a standard thermal oven. This movement of hot air maintains a consistent temperature throughout the oven The convection bake range can be set between 170°F and - KitchenAid KGRA806PSS | Use and Care Guide - Page 18
models) Convection roasting can be used for roasting meats and poultry, or for baking yeast breads and loaf cakes using a single rack. During convection roasting, the bake burner and broil element will cycle on and off in intervals to maintain oven 25 25-30 30-35 22-25 27-30 32-35 20-25 25-30 30-35 - KitchenAid KGRA806PSS | Use and Care Guide - Page 19
oven door is opened during convection broiling, the broil burner and the broil element and fan will turn off after 30 section for diagram. 1. Press CONVECT FULL MEAL. 2. Press number to select oven setting from If a power failure occurs when the Sabbath Mode is set, the oven will remain Sabbath Mode - KitchenAid KGRA806PSS | Use and Care Guide - Page 20
oven will automatically turn off. The oven control will remain Sabbath Mode compliant until the OFF button is pressed. Temperature Change The oven temperature can be changed when the oven Place on rack guide 2, then place broiler pan on guide 1. See "Positioning Racks and Bakeware" for diagram. Put 2 - KitchenAid KGRA806PSS | Use and Care Guide - Page 21
OFF to stop reminder tones or open the oven door. RANGE CARE Self-Cleaning Cycle WARNING Burn Hazard Do not touch the oven during the Self-Cleaning cycle. Keep children away from oven during Self-Cleaning cycle. Failure to follow these instructions can result in burns. IMPORTANT: The health of - KitchenAid KGRA806PSS | Use and Care Guide - Page 22
cleaning, make sure all controls are off and the oven and cooktop are cool. Always follow label instructions on cleaning products. Soap, water and a soft cloth or sponge are suggested first unless otherwise noted. EXTERIOR PORCELAIN ENAMEL SURFACES (on some models) Food spills containing acids - KitchenAid KGRA806PSS | Use and Care Guide - Page 23
away from control panel to remove. OVEN DOOR EXTERIOR guides in the cavity. 2. Slide the drawer closed. Oven Door For normal range use, it is not suggested to remove the oven door. However, if removal is necessary, make sure the oven is off and cool. Then, follow these instructions. The oven - KitchenAid KGRA806PSS | Use and Care Guide - Page 24
Plug into a grounded outlet. s Has a household fuse blown or has a circuit breaker tripped? Replace the fuse or reset the circuit. s Is the range properly connected to the gas supply? Contact a trained repair specialist or see Installation Instructions. Surface burners will not operate s Is this the - KitchenAid KGRA806PSS | Use and Care Guide - Page 25
. s On some models, is the Control Lock set? See "Control Lock" section. s On some models, is the Sabbath Mode set? See "Sabbath Mode" Section. Oven burner flames are yellow or noisy s Is propane gas being used? The appliance might have been converted improperly. Contact a trained repair specialist - KitchenAid KGRA806PSS | Use and Care Guide - Page 26
of appliances. s Installation information. s Accessory and repair parts sales. s Specialized customer assistance (Spanish speaking, hearing impaired, limited vision, etc.). s Referrals to local dealers, repair parts distributors, and service companies. KitchenAid designated service technicians are - KitchenAid KGRA806PSS | Use and Care Guide - Page 27
factory specified parts and repair labor costs to correct defects in materials or workmanship. Service must be provided by a KitchenAid designated service company. SECOND THROUGH FIFTH YEAR LIMITED WARRANTY ON ELECTRIC ELEMENTS, CERAMIC GLASS COOKTOP, GAS BURNERS, SOLID STATE TOUCH CONTROL SYSTEM - KitchenAid KGRA806PSS | Use and Care Guide - Page 28
• Appeler immédiatement le fournisseur de gaz d'un téléphone voisin. Suivre ses instructions. • À défaut de joindre votre fournisseur de gaz, appeler les pompiers. - L'installation et l'entretien doivent être effectués par un installateur qualifié, une agence de service ou le fournisseur de gaz. 28 - KitchenAid KGRA806PSS | Use and Care Guide - Page 29
service les instructions d'installation. Le non-respect de ces instructions peut causer codes électriques locaux ou en l'absence de codes locaux, selon le Code électrique national (US) ANSI/NFPA 70 ou le Code canadien des installations, Partie 1. S'assurer que la cuisinière est correctement install - KitchenAid KGRA806PSS | Use and Care Guide - Page 30
325˚ 350˚ 400˚ 425˚ Bake Bake Broil Broil Roast Bread Proof Full Meal MED LOW HI ON F C CONTROL LOCKED CLEAN TIME PROBE TEMP HR MIN COOK TIME NIGHT LIGHT DELAY MIN HR AM PM SEC MIN START TIME STOP de commande avant droit (6000 BTU) G. Bouton de commande arrière droit (12 500 BTU) 30 - KitchenAid KGRA806PSS | Use and Care Guide - Page 31
Cuisinière F G A H B I 7 DI J K L C M D E A. Brûleur de surface arrière gauche et grille B. Brûleur de surface avant gauche et grille (sur certains modèles, brûleur à flamme TripleTier™ à double soupape avec anneau InstaWok™) C. Bride antibasculement D. Plaque signalétique des numéros de - KitchenAid KGRA806PSS | Use and Care Guide - Page 32
le tableau suivant comme guide pour les caractéristiques du peuvent aussi offrir de l'aide. Commandes de la table Burner (Brûleur à flamme TripleTier) comprennent une trousse de conversion au gaz propane TripleTier™ et une trousse pour les cuisinières standard. Voir les "Instructions d'installation - KitchenAid KGRA806PSS | Use and Care Guide - Page 33
Les trois brûleurs produiront une flamme. 3. Tourner le bouton n'importe où entre POWER BURNER HI (brûleur puissance élevée) et POWER BURNER LO (brûleur puissance basse). SHIMi MEMRedBURLNoER Utiliser le tableau suivant comme guide lors du réglage des niveaux de chaleur des brûleurs. RÉGLAGE SUR - KitchenAid KGRA806PSS | Use and Care Guide - Page 34
bouton n'importe où entre HI et LO. Utiliser le tableau suivant comme guide lors du réglage des niveaux de chaleur. RÉGLAGE UTILISATION RECOMMANDÉE à haute puissance et bas réglages de mijotage". L'anneau InstaWok™ supporte les wok de 12" à 14" (30,5 cm à 35,6 cm) et on peut le retourner pour en - KitchenAid KGRA806PSS | Use and Care Guide - Page 35
Brûleurs de surface IMPORTANT : Ne pas entraver l'évacuation de l'air de combustion et de ventilation autour des bords des grilles de brûleur. Avant le nettoyage, s'assurer que toutes les commandes sont éteintes et que le four et la table de cuisson sont froids. Ne pas utiliser de nettoyants à four, - KitchenAid KGRA806PSS | Use and Care Guide - Page 36
ni déformer l'orifice. Ne pas utiliser un cure-dents en bois. Si le brûleur a besoin d'être ajusté, contacter un technicien de réparation qualifié. 4. Réinstaller le chapeau du brûleur et s'assurer que les tiges d'alignement sur le chapeau sont bien alignées avec la base du brûleur. A B A. Incorrect - KitchenAid KGRA806PSS | Use and Care Guide - Page 37
du four marche/arrêt O. Arrêt P. Mise en marche (verrouillage des commandes) D E AM 325˚ 350˚ 400˚ 425˚ Bake Broil Bread Proof MED LOW HI ON F C CONTROL LOCKED CLEAN TIME PROBE TEMP HR MIN COOK TIME NIGHT LIGHT DELAY PM MIN HR SEC MIN START TIME STOP TIME A Self Clean Cook Stop - KitchenAid KGRA806PSS | Use and Care Guide - Page 38
minutée sont éteints. Appuyer sur la touche START (mise en marche) pendant 5 secondes jusqu'à ce que CONTROL LOCK (verrouillage de la commande) s'affiche. Recommencer pour déverrouiller et effacer CONTROL LOCK. Arrêt La touche OFF arrête toutes les fonctions du four à l'exception de l'horloge, de - KitchenAid KGRA806PSS | Use and Care Guide - Page 39
nombre de degrés affiché. Se servir du tableau suivant comme guide. AJUSTEMENT EN °F (CHANGEMENT AUTOMATIQUE EN °C) CUIT LES ALIMENTS 10°F (5°C) 10°C) ...modérément plus 30°F (15°C) ...beaucoup plus -10°F (-5°C) ...un peu moins -20°F (-10°C) ...modérément moins -30°F (-15°C) ...beaucoup - KitchenAid KGRA806PSS | Use and Care Guide - Page 40
recommandé dans la recette. Se servir du tableau suivant comme guide. USTENSILES DE CUISSON/ RÉSULTATS RECOMMANDATIONS Aluminium légèrement coloré . Ne pas toucher l'élément du gril. Le non-respect de ces instructions peut causer des brûlures. La sonde thermométrique mesure exactement la temp - KitchenAid KGRA806PSS | Use and Care Guide - Page 41
grille, la tirer jusqu'à la position d'arrêt, soulever le bord avant et la sortir. Utiliser le schéma et le tableau suivants comme guide. 5 4 3 2 1 Cuisson traditionnelle ALIMENT POSITION DE LA GRILLE Tartes congelées, gros rôtis, dindes et gâteaux des anges 1 ou 2 Gâteaux Bundt, la plupart - KitchenAid KGRA806PSS | Use and Care Guide - Page 42
de cuisson et les parois du four. Se servir du tableau suivant comme guide. NOMBRE D'USTENSILES POSITION SUR LA GRILLE 1 Centre de la grille. 2 et l'élément de cuisson au four s'éteint après un délai allant de 30 secondes à 2 minutes. Ces éléments se remettent en marche lorsqu'on referme - KitchenAid KGRA806PSS | Use and Care Guide - Page 43
aliments peuvent être cuits en réduisant les températures de cuisson de 25°F à 50°F (14°C à 28°C) et la durée de cuisson peut être réduite jusqu'à 30 pour cent, surtout pour les gros rôtis et dindes. s Il est important de ne pas couvrir les aliments de telle sorte que les surfaces demeurent - KitchenAid KGRA806PSS | Use and Care Guide - Page 44
optimaux, le four incitera à faire la vérification des aliments à la fin de la période de cuisson non différée. Utiliser le tableau suivant comme guide. RÉGLAGE TYPE D'ALIMENTS VIANDES Pommes de terre au four; poulet : entier et en morceaux; Pain de viande, rôtis : porc, boeuf et jambon (La - KitchenAid KGRA806PSS | Use and Care Guide - Page 45
aloyau saignant à point bien cuit Pain de viande 20-25 25-30 30-35 22-25 27-30 32-35 20-25 25-30 30-35 20-25 300°F (149°C) 140°F (60°C) 160°F °C) Agneau, position de grille 2 Gigot, rôti d'épaule à point bien cuit 25-30 30-35 300°F (149°C) 160°F (71°C) 170°F (77°C) Poulet*, position de grille - KitchenAid KGRA806PSS | Use and Care Guide - Page 46
cuisson par convection, les éléments du gril et le ventilateur s'éteignent après 30 secondes. Ils se remettent en marche dès que l'on referme la porte. ée de cuisson ou la température de sonde. Utiliser le tableau suivant comme guide. s Tous les aliments doivent être à la température du réfrigérateur - KitchenAid KGRA806PSS | Use and Care Guide - Page 47
avant ou après la cuisson. Le non-respect de cette instruction peut causer un empoisonnement alimentaire ou une maladie. 1. Appuyer ériques de 1 à 0 représentent diverses températures. Se servir du tableau suivant comme guide. TOUCHE NUMÉRIQUE TEMPÉRATURE DU FOUR 1 170°F (77°C) 2 200°F (95°C) - KitchenAid KGRA806PSS | Use and Care Guide - Page 48
prépare la pâte pour la cuisson en faisant agir la levure. Suivre les instructions de la recette. Pour faire lever le pain : Avant la première levée, une heure avant ou après la cuisson. Le non-respect de cette instruction peut causer un empoisonnement alimentaire ou une maladie. La cuisson minutée - KitchenAid KGRA806PSS | Use and Care Guide - Page 49
cours du programme d'autonettoyage. Le non-respect de ces instructions peut causer des brûlures. Fonctionnement du programme IMPORTANT : 30 minutes pour des saletés légères et de 3 h 30 minutes jusqu'à 4 h 30 minutes pour des saletés moyennes à abondantes. Utiliser le tableau ci-dessous comme guide - KitchenAid KGRA806PSS | Use and Care Guide - Page 50
durée de nettoyage autre que 2 h 30 min, entrer la durée en utilisant les sont froids. Toujours suivre les instructions sur les étiquettes des produits voir la section "Assistance ou service" pour passer une commande. les boutons. Lors de la réinstallation des boutons, s'assurer que chaque bouton - KitchenAid KGRA806PSS | Use and Care Guide - Page 51
pas durant le programme d'autonettoyage. Quand la porte est fermée, appuyer sur OVEN LIGHT (lampe du four) pour allumer ou éteindre la ou les lampe(s). et le tirer. Pour réinstaller : 1. Placer les extrémités des rails du tiroir dans les guides de la cavité. 2. Fermer le tiroir en le glissant - KitchenAid KGRA806PSS | Use and Care Guide - Page 52
enlever, s'assurer que le four est éteint et froid. Puis suivre ces instructions. La porte du four est lourde. Enlèvement : 1. Ouvrir la porte du four complètement. 2. Relever le verrou de charnière de chaque côté. Réinstallation : 1. Insérer les deux bras de suspension dans la porte. 3. Fermer la - KitchenAid KGRA806PSS | Use and Care Guide - Page 53
l'utilisation du brûleur de surface et contacter un technicien de service. s Utilise-t-on un ustensile de cuisson approprié? Voir la section cuisson". s L'appareil est-il d'aplomb? Niveler l'appareil. Voir les instructions d'installation. Le four ne fonctionne pas s Le four est-il utilisé pour la - KitchenAid KGRA806PSS | Use and Care Guide - Page 54
température de cuisson. ASSISTANCE OU SERVICE Avant de faire un appel pour assistance ou service, consulter la section "Dépannage". Ce guide peut vous faire économiser le coût d'une visite de service. Si vous avez encore besoin d'aide, suivre les instructions ci-dessous. Lors d'un appel, veuillez - KitchenAid KGRA806PSS | Use and Care Guide - Page 55
aux instructions fournies avec le produit, KitchenAid paiera aide additionnelle peut être trouvée en vérifiant la section "Assistance ou Service" ou en téléphonant sans frais au Centre d'interaction avec la clientèle KitchenAid, au 1-800-461-5681. Pour pièces, accessoires, installation et service - KitchenAid KGRA806PSS | Use and Care Guide - Page 56
© 2004. All rights reserved. Tous droits réservés. ® Registered Trademark/TM Trademark of KitchenAid, U.S.A., KitchenAid Canada licensee in Canada ® Marque déposée/TM Marque de commerce de KitchenAid, U.S.A., Emploi licencié par KitchenAid Canada au Canada 5/04 Printed in U.S.A. Imprimé aux É.-U.
-
 1
1 -
 2
2 -
 3
3 -
 4
4 -
 5
5 -
 6
6 -
 7
7 -
8
-
9
-
10
-
11
-
12
-
13
-
14
-
15
-
16
-
17
-
18
-
19
-
20
-
21
-
22
-
23
-
24
-
25
-
26
-
27
-
28
-
29
-
30
-
31
-
32
-
33
-
34
-
35
-
36
-
37
-
38
-
39
-
40
-
41
-
42
-
43
-
44
-
45
-
46
-
47
-
48
-
49
-
50
-
51
-
52
-
53
-
54
-
55
-
56
 |
 |
Models/Modèles
KGRI801 KGRA806 KGRK806 KGSI901 KGSA906
9757452
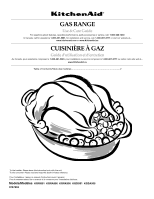
GAS RANGE
Use & Care Guide
For questions about features, operation/performance, parts accessories or service, call:
1-800-422-1230
In Canada, call for assistance
1-800-461-5681
, for installation and service, call:
1-800-807-6777
or visit our website at...
www.kitchenaid.com
or
www.KitchenAid.ca
CUISINIÈRE À GAZ
Guide d’utilisation et d’entretien
Au Canada, pour assistance composez le
1-800-461-5681
, pour installation ou service composez le
1-800-807-6777
ou visitez notre site web à...
www.KitchenAid.ca
Table of Contents/Table des matières
.............................................................................
2
To the installer: Please leave this instruction book with the unit.
To the consumer: Please read and keep this book for future reference.
Pour l'installateur : laisser ce manuel d'instructions avec l'appareil.
Pour le consommateur: lire ce manuel et le conserver pour consultation ult
é
rieure.