Konica Minolta C83hc High Chroma SD-513 User Manual - Page 70
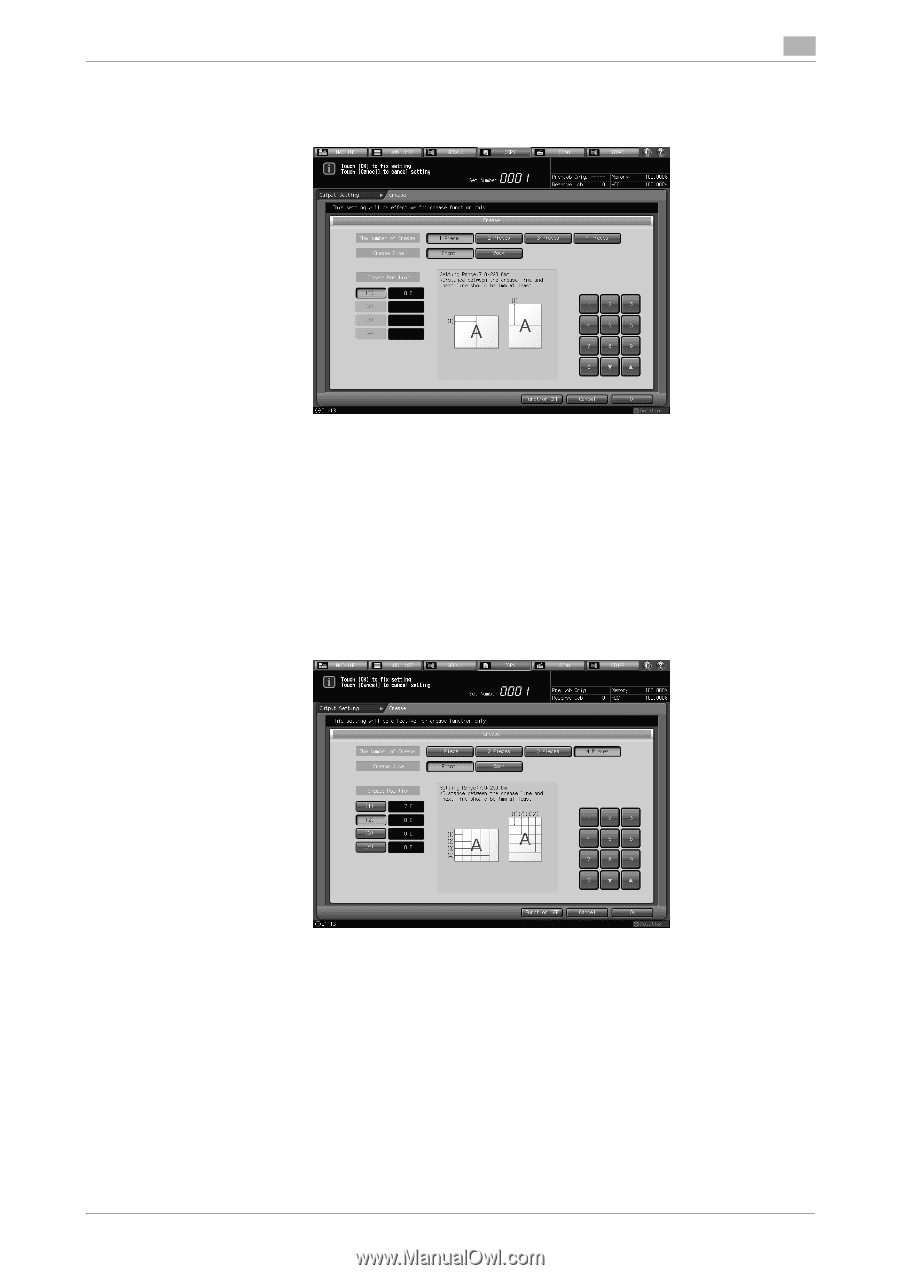
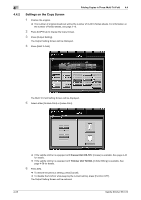
Select from [1 Piece] to [4 Pieces].
 |
View all Konica Minolta C83hc High Chroma manuals
Add to My Manuals
Save this manual to your list of manuals |
Page 70 highlights
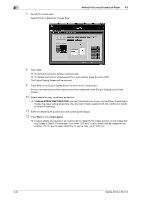
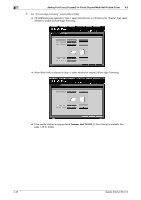
4.5 Adding Fold Lines (Creases) on Paper 4 5 Specify the number of crease. Select from [1 Piece] to [4 Pieces]. 6 Specify the crease position. Select [(1)] for "Crease Position", and press the keypad, [,], or [+] to enter the first crease position. Specify the remaining crease positions likewise. % Crease Position that can be specified shifts according to the paper length (on the longer side). When Paper Length La is 240 mm or more and 336 mm or less, Crease Position (1) is 7 mm to (La - 46) mm (in 0.1 mm increments). When Paper Length Lb is 337 mm or more and 488 mm or less, Crease Position (1) is (Lb - 330) mm to 290 mm (in 0.1 mm increments). % For the second and subsequent crease positions, when Paper Length La is 240 mm or more and 336 mm or less, enter a value greater than that of the preceding crease by 1.0 mm to (La - 46) mm. When Paper Length Lb is 337 mm or more and 488 mm or less, enter a value greater than that of the preceding crease by 1.0 mm to 290 mm. Saddle Stitcher SD-513 4-33
-
 1
1 -
2
-
3
-
4
-
5
-
6
-
7
-
8
-
9
-
10
-
11
-
12
-
13
-
14
-
15
-
16
-
17
-
18
-
19
-
20
-
21
-
22
-
23
-
24
-
25
-
26
-
27
-
28
-
29
-
30
-
31
-
32
-
33
-
34
-
35
-
36
-
37
-
38
-
39
-
40
-
41
-
42
-
43
-
44
-
45
-
46
-
47
-
48
-
49
-
50
-
51
-
52
-
53
-
54
-
55
-
56
-
57
-
58
-
59
-
60
-
61
-
62
-
63
-
64
-
 65
65 -
 66
66 -
 67
67 -
 68
68 -
 69
69 -
 70
70 -
 71
71 -
 72
72 -
 73
73 -
 74
74 -
 75
75 -
76
-
77
-
78
-
79
-
80
-
81
-
82
-
83
-
84
-
85
-
86
-
87
-
88
-
89
-
90
-
91
-
92
-
93
-
94
-
95
-
96
-
97
-
98
-
99
-
100
-
101
-
102
-
103
-
104
-
105
-
106
-
107
-
108
-
109
-
110
-
111
-
112
-
113
-
114
-
115
-
116
-
117
-
118
-
119
-
120
-
121
-
122
-
123
-
124
-
125
-
126
-
127
-
128
-
129
-
130
-
131
-
132
-
133
-
134
-
135
-
136
-
137
-
138
-
139
-
140
-
141
-
142
-
143
-
144
-
145
-
146
-
147
-
148
-
149
-
150
-
151
-
152
-
153
-
154
-
155
-
156
-
157
-
158
-
159
-
160
-
161
-
162
-
163
-
164
-
165
-
166
-
167
-
168
-
169
-
170
-
171
-
172
-
173
-
174
-
175
-
176
-
177
-
178
-
179
-
180
-
181
-
182
-
183
-
184
-
185
-
186
-
187
-
188
-
189
-
190
-
191
-
192
-
193
-
194
-
195
-
196
-
197
-
198
-
199
-
200
-
201
-
202
 |
 |