Konica Minolta KIP 7900 KIP 7900 User Guide - Page 17
D-Sub Connector 9 pins: max.12Vdc Small, Inlet Socket - parts
 |
View all Konica Minolta KIP 7900 manuals
Add to My Manuals
Save this manual to your list of manuals |
Page 17 highlights
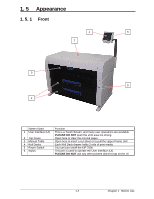
1. 5. 2 Rear 1 2 4 5 3 6 7 Name of part 1 Exit Cover 2 Dehumidify Heater Switch 3 Inlet Socket 4 Breaker 5 USB connector (USB2.0) 6 COM Port 7 LAN Port Function Open the Exit Cover when you remove the mis-fed media. Press "H" to turn on the Dehumidify Heater, and press "L" to turn it off. Connect the power cord here. NOTE: Specification for the power cord used in North America Use the following type of power cord (UL-Listed). (1) Rating 250VAC, 20A (2) Plug type NEMA6-20 (3) Socket type IEC60320 : C19 (4) Cord SJT 3xAWG12 L
-
 1
1 -
2
-
3
-
4
-
5
-
6
-
7
-
8
-
9
-
10
-
11
-
 12
12 -
 13
13 -
 14
14 -
 15
15 -
 16
16 -
 17
17 -
 18
18 -
 19
19 -
 20
20 -
 21
21 -
 22
22 -
23
-
24
-
25
-
26
-
27
-
28
-
29
-
30
-
31
-
32
-
33
-
34
-
35
-
36
-
37
-
38
-
39
-
40
-
41
-
42
-
43
-
44
-
45
-
46
-
47
-
48
-
49
-
50
-
51
-
52
-
53
-
54
-
55
-
56
-
57
-
58
-
59
-
60
-
61
-
62
-
63
-
64
-
65
-
66
-
67
 |
 |

Chapter 1
Before Use
1-8
1. 5. 2
Rear
Name of part
Function
1
Exit Cover
Open the Exit Cover when you remove the mis-fed media.
2
Dehumidify Heater
Switch
Press “H” to turn on the Dehumidify Heater, and press “L” to turn it
off.
3
Inlet Socket
Connect the power cord here.
NOTE
: Specification for the power cord used in North America
Use the following type of power cord (UL-Listed).
(1) Rating
250VAC, 20A
(2) Plug type
NEMA6-20
(3) Socket type
IEC60320 : C19
(4) Cord
SJT 3xAWG12 L <4.5m
(5) UL-Listed
4
Breaker
It is possible to shut off supplying the AC power.
5
USB connector
(USB2.0)
Connect the cable to this terminal for a KIP Scanner (option).
(max.5Vdc)
6
COM Port
Connect the cable from a finishing device (option).
(D-Sub Connector 9 pins: max.12Vdc (Small))
7
LAN Port
Connect the LAN Cable to connect the KIP 7900 to the network.
(Do not connect a telephone line.)
1
2
3
4
5
6
7