Konica Minolta KIP 7900 KIP 7900 User Guide - Page 59
Ejected prints will be stacked incorrectly on Print Tray until you move it from release
 |
View all Konica Minolta KIP 7900 manuals
Add to My Manuals
Save this manual to your list of manuals |
Page 59 highlights
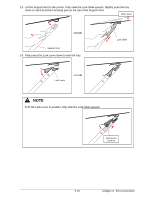
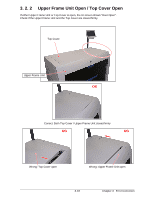
12. Hold the thick wire parts of the tray and insert the hook parts at the "lock position" on the top face of the printer's rear beam. Hold the thick wire Hold the thick wire Lock Position Lift up the entire tray Release Position rear beam NOTE (1) Do not hold a thinner wire to carry the entire tray. (2) Ejected prints will be stacked incorrectly on Print Tray until you move it from "release position" to "lock position". 3-14 Chapter 3 Error Correction
-
 1
1 -
2
-
3
-
4
-
5
-
6
-
7
-
8
-
9
-
10
-
11
-
12
-
13
-
14
-
15
-
16
-
17
-
18
-
19
-
20
-
21
-
22
-
23
-
24
-
25
-
26
-
27
-
28
-
29
-
30
-
31
-
32
-
33
-
34
-
35
-
36
-
37
-
38
-
39
-
40
-
41
-
42
-
43
-
44
-
45
-
46
-
47
-
48
-
49
-
50
-
51
-
52
-
53
-
 54
54 -
 55
55 -
 56
56 -
 57
57 -
 58
58 -
 59
59 -
 60
60 -
 61
61 -
 62
62 -
 63
63 -
 64
64 -
65
-
66
-
67
 |
 |

Chapter 3
Error Correction
3-14
12.
Hold the thick wire parts of the tray and insert the hook parts at the “lock position” on the top
face of the printer’s rear beam.
NOTE
(1) Do not hold a thinner wire to carry the entire tray.
(2) Ejected prints will be stacked incorrectly on Print Tray until you move it from “release
position” to “lock position”.
Lock Position
Release Position
Hold the thick wire
Hold the thick wire
Lift up the entire tray
rear beam