Konica Minolta ScanDIVA ScanDIVA User Guide - Page 30
Power Cord, USB Cable, Manual Switch Option, Stopper, Center Mark, Glass Plate Unit Option
 |
View all Konica Minolta ScanDIVA manuals
Add to My Manuals
Save this manual to your list of manuals |
Page 30 highlights
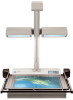
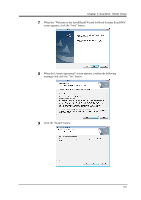
ScanDIVA User's Guide 9. Power Cord: 10. USB Cable: 11. Manual Switch (Option): 12. Stopper: 13. Center Mark: 14. Glass Plate Unit (Option): Connects the Scanner to the Power Outlet. Connects the Scanner to the Personal Computer. Press this switch instead of the "SCAN" button on the "Book Scanner" screen to start scanning. Used as the reference position for the original. When placing the original, align its top edge with this position. Adjust the center of the original to this mark. Used with sheet documents that have curls or folds, and with books to flatten the surface being scanned. 2-4
-
 1
1 -
2
-
3
-
4
-
5
-
6
-
7
-
8
-
9
-
10
-
11
-
12
-
13
-
14
-
15
-
16
-
17
-
18
-
19
-
20
-
21
-
22
-
23
-
24
-
 25
25 -
 26
26 -
 27
27 -
 28
28 -
 29
29 -
 30
30 -
 31
31 -
 32
32 -
 33
33 -
 34
34 -
 35
35 -
36
-
37
-
38
-
39
-
40
-
41
-
42
-
43
-
44
-
45
-
46
-
47
-
48
-
49
-
50
-
51
-
52
-
53
-
54
-
55
-
56
-
57
-
58
-
59
-
60
-
61
-
62
-
63
-
64
-
65
-
66
-
67
-
68
-
69
-
70
-
71
-
72
-
73
-
74
-
75
-
76
-
77
-
78
-
79
-
80
-
81
-
82
-
83
-
84
-
85
-
86
-
87
-
88
-
89
-
90
-
91
-
92
-
93
-
94
-
95
-
96
-
97
-
98
-
99
-
100
-
101
-
102
-
103
-
104
 |
 |

ScanDIVA User’s Guide
2-4
9. Power Cord:
Connects the Scanner to the Power Outlet.
10. USB Cable:
Connects the Scanner to the Personal Computer.
11. Manual Switch (Option):
Press this switch instead of the “SCAN” button on the “Book
Scanner” screen to start scanning.
12. Stopper:
Used as the reference position for the original. When placing
the original, align its top edge with this position.
13. Center Mark:
Adjust the center of the original to this mark.
14. Glass Plate Unit (Option):
Used with sheet documents that have curls or folds, and with
books to flatten the surface being scanned.