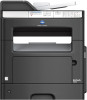
Konica Minolta bizhub 3320 bizhub 3320 User Guide - Page 28
Setting up the printer software, For Windows users, For Macintosh users - driver for windows 7
 |
View all Konica Minolta bizhub 3320 manuals
Add to My Manuals
Save this manual to your list of manuals |
Page 28 highlights
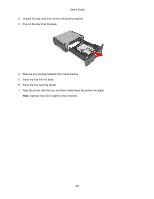
Use the 4 EXT port 5 LINE port 6 USB printer port 7 Security slot User's Guide To Connect additional devices (telephone or answering machine) to the printer and the telephone line. Use this port if you do not have a dedicated fax line for the printer and if this connection method is supported in your country or region. Note: Remove the plug to access the port. Connect the printer to an active telephone line through a standard wall jack (RJ-11), DSL filter, or VoIP adapter, or any other adapter that allows you to access the telephone line to send and receive faxes. Connect the printer to a computer. Attach a lock that will secure the printer in place. Setting up the printer software Installing the printer driver For Windows users 1. Insert the Drivers and Documentation CD in the CD/DVD drive of your PC. 2. Follow the instructions on the screen. Note: The PostScript driver may not be installed to your PC which runs Windows Vista if it is connected to the printer via a USB cable. In that case, select USB port in the "Add a printer" wizard to install the printer driver. 3. Click Install, and then follow the instructions on the computer screen. For Macintosh users 1. Insert the Drivers and Documentation CD in the CD drive of your Macintosh. 2. Double-click the CD icon on the desktop, the Drivers folder, and the Mac folder. → Mac OS X v10.3/v10.4: double-click bizhub_4020_3320_103104.pkg → Mac OS X v10.5: in the english (other) folder, double-click bizhub_4020_3320_105.pkg → Mac OS X v10.6/v10.7/v10.8: in the english (other) folder, double-click bizhub_4020_3320_106.pkg - 28 -
-
 1
1 -
2
-
3
-
4
-
5
-
6
-
7
-
8
-
9
-
10
-
11
-
12
-
13
-
14
-
15
-
16
-
17
-
18
-
19
-
20
-
21
-
22
-
 23
23 -
 24
24 -
 25
25 -
 26
26 -
 27
27 -
 28
28 -
 29
29 -
 30
30 -
 31
31 -
 32
32 -
 33
33 -
34
-
35
-
36
-
37
-
38
-
39
-
40
-
41
-
42
-
43
-
44
-
45
-
46
-
47
-
48
-
49
-
50
-
51
-
52
-
53
-
54
-
55
-
56
-
57
-
58
-
59
-
60
-
61
-
62
-
63
-
64
-
65
-
66
-
67
-
68
-
69
-
70
-
71
-
72
-
73
-
74
-
75
-
76
-
77
-
78
-
79
-
80
-
81
-
82
-
83
-
84
-
85
-
86
-
87
-
88
-
89
-
90
-
91
-
92
-
93
-
94
-
95
-
96
-
97
-
98
-
99
-
100
-
101
-
102
-
103
-
104
-
105
-
106
-
107
-
108
-
109
-
110
-
111
-
112
-
113
-
114
-
115
-
116
-
117
-
118
-
119
-
120
-
121
-
122
-
123
-
124
-
125
-
126
-
127
-
128
-
129
-
130
-
131
-
132
-
133
-
134
-
135
-
136
-
137
-
138
-
139
-
140
-
141
-
142
-
143
-
144
-
145
-
146
-
147
-
148
-
149
-
150
-
151
-
152
-
153
-
154
-
155
-
156
-
157
-
158
-
159
-
160
-
161
-
162
-
163
-
164
-
165
-
166
-
167
-
168
-
169
-
170
-
171
-
172
-
173
-
174
-
175
-
176
-
177
-
178
-
179
-
180
-
181
-
182
-
183
-
184
-
185
-
186
-
187
-
188
-
189
-
190
-
191
-
192
-
193
-
194
-
195
-
196
-
197
-
198
-
199
-
200
-
201
-
202
-
203
-
204
-
205
-
206
-
207
-
208
-
209
-
210
-
211
-
212
-
213
-
214
-
215
-
216
-
217
-
218
-
219
-
220
-
221
-
222
-
223
-
224
-
225
-
226
-
227
-
228
-
229
-
230
-
231
-
232
-
233
-
234
-
235
-
236
-
237
-
238
-
239
-
240
-
241
-
242
-
243
-
244
-
245
-
246
-
247
-
248
-
249
-
250
-
251
-
252
-
253
-
254
-
255
-
256
-
257
-
258
-
259
-
260
-
261
-
262
-
263
-
264
-
265
-
266
-
267
-
268
-
269
-
270
-
271
-
272
-
273
-
274
-
275
-
276
-
277
-
278
-
279
-
280
-
281
-
282
-
283
-
284
-
285
-
286
-
287
-
288
-
289
-
290
-
291
-
292
-
293
-
294
-
295
-
296
 |
 |
