Konica Minolta bizhub PRO 1051 bizhub PRO 1051/1200 Quick Guide - Page 101
Main window of the ToneCurve Utility, Print Settings window, PS Plug-in driver.
 |
View all Konica Minolta bizhub PRO 1051 manuals
Add to My Manuals
Save this manual to your list of manuals |
Page 101 highlights
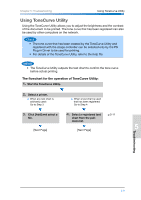
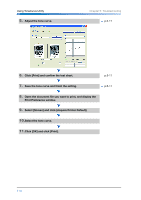
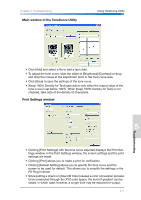
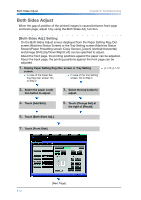
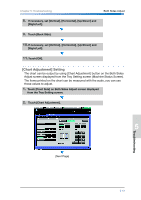
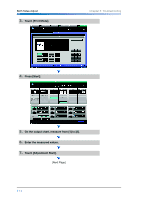
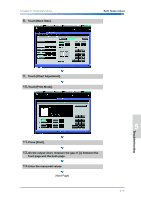
Chapter 5: Troubleshooting Main window of the ToneCurve Utility Using ToneCurve Utility 1 2 • Click [Add] and select a file to add a test chart. • To adjust the tone curve, slide the slider of [Brightness]/[Contrast] or drug 3 and drop the mouse at the adjustment point in the tone curve area. • Click [Save] to save the settings of the tone curve. • [Keep 100% Density for Text] gets active only when the output value of the tone curve is set below 100%. When [Keep 100% Density for Text] is not checked, take note of the density of characters. Print Settings window 4 5 Troubleshooting • Clicking [Print Settings] with the tone curve adjusted displays the Print Settings window. In the Print Settings window, the screen settings and the print 6 settings are made. • Clicking [Print] allows you to make a print for verification. • Clicking [Default Setting] allows you to specify the tone curve and the screen to be used for default. This allows you to simplify the settings in the PS Plug-in driver. • Since putting a check on [Use CIE Color] causes a color conversion process to be conducted through the XYZ color space, the level of gradient can be raised, in which case, however, a longer time may be required for output. 7 5-11
-
 1
1 -
2
-
3
-
4
-
5
-
6
-
7
-
8
-
9
-
10
-
11
-
12
-
13
-
14
-
15
-
16
-
17
-
18
-
19
-
20
-
21
-
22
-
23
-
24
-
25
-
26
-
27
-
28
-
29
-
30
-
31
-
32
-
33
-
34
-
35
-
36
-
37
-
38
-
39
-
40
-
41
-
42
-
43
-
44
-
45
-
46
-
47
-
48
-
49
-
50
-
51
-
52
-
53
-
54
-
55
-
56
-
57
-
58
-
59
-
60
-
61
-
62
-
63
-
64
-
65
-
66
-
67
-
68
-
69
-
70
-
71
-
72
-
73
-
74
-
75
-
76
-
77
-
78
-
79
-
80
-
81
-
82
-
83
-
84
-
85
-
86
-
87
-
88
-
89
-
90
-
91
-
92
-
93
-
94
-
95
-
 96
96 -
 97
97 -
 98
98 -
 99
99 -
 100
100 -
 101
101 -
 102
102 -
 103
103 -
 104
104 -
 105
105 -
 106
106 -
107
-
108
-
109
-
110
-
111
-
112
-
113
-
114
-
115
-
116
-
117
-
118
-
119
-
120
-
121
-
122
-
123
-
124
-
125
-
126
-
127
-
128
-
129
-
130
-
131
-
132
-
133
-
134
 |
 |
