Konica Minolta bizhub PRO 1051 bizhub PRO 1051/1200 Quick Guide - Page 80
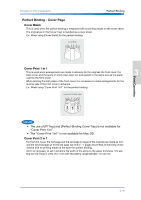
The use of [PI Tray] and [Perfect Binding Cover Tray] is not available for, Cover Print 2in1.
 |
View all Konica Minolta bizhub PRO 1051 manuals
Add to My Manuals
Save this manual to your list of manuals |
Page 80 highlights
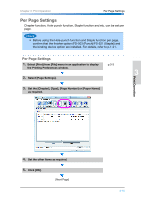
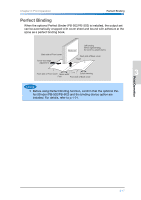
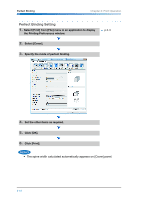
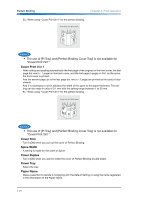
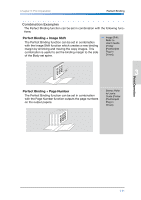
Perfect Binding Chapter 3: Print Operation Ex.: When using "Cover Print 2in1" for the perfect binding. Cover Print 2in1 (Both sides) 2n- • The use of [PI Tray] and [Perfect Binding Cover Tray] is not available for "Cover Print 2in1". Cover Print 3 in 1 After cutting and pasting automatically the first page of the original on the front cover, the last page but one (n - 1 page) on the back cover, and the last page (n page) on 3in1 as the spine, the front cover is printed. And the second page up to the last page but two (n - 2 page) are printed as the body of documents. And it is necessary to set in advance the width of the spine to the paper thickness. The setting can be made in units of 0.1 mm with the setting range between 1 to 30 mm. Ex.: When using "Cover Print 3in1" for the perfect binding. Cover Print 3in1 (Both sides) n-3 • The use of [PI Tray] and [Perfect Binding Cover Tray] is not available for "Cover Print 3in1". Cover Trim Turn it [ON] when you cut out the cover of Perfect Binding. Spine Width A setting is made for the width of Spine. Cover Duplex Turn it [ON] when you want to make the cover of Perfect Binding double-sided. Cover Tray Select the tray. Paper Name Make a selection to decide if complying with the Default Setting or using the name registered in the information of the Paper Name. 3-20
-
 1
1 -
2
-
3
-
4
-
5
-
6
-
7
-
8
-
9
-
10
-
11
-
12
-
13
-
14
-
15
-
16
-
17
-
18
-
19
-
20
-
21
-
22
-
23
-
24
-
25
-
26
-
27
-
28
-
29
-
30
-
31
-
32
-
33
-
34
-
35
-
36
-
37
-
38
-
39
-
40
-
41
-
42
-
43
-
44
-
45
-
46
-
47
-
48
-
49
-
50
-
51
-
52
-
53
-
54
-
55
-
56
-
57
-
58
-
59
-
60
-
61
-
62
-
63
-
64
-
65
-
66
-
67
-
68
-
69
-
70
-
71
-
72
-
73
-
74
-
 75
75 -
 76
76 -
 77
77 -
 78
78 -
 79
79 -
 80
80 -
 81
81 -
 82
82 -
 83
83 -
 84
84 -
 85
85 -
86
-
87
-
88
-
89
-
90
-
91
-
92
-
93
-
94
-
95
-
96
-
97
-
98
-
99
-
100
-
101
-
102
-
103
-
104
-
105
-
106
-
107
-
108
-
109
-
110
-
111
-
112
-
113
-
114
-
115
-
116
-
117
-
118
-
119
-
120
-
121
-
122
-
123
-
124
-
125
-
126
-
127
-
128
-
129
-
130
-
131
-
132
-
133
-
134
 |
 |
