Kyocera ECOSYS P5021cdw Kyocera Command Center RX User Guide Rev-8.2016.3 - Page 53
Send and Forward, General, Destination
 |
View all Kyocera ECOSYS P5021cdw manuals
Add to My Manuals
Save this manual to your list of manuals |
Page 53 highlights
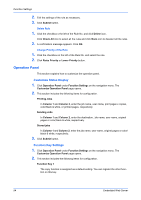
Function Settings 8. Click Submit button. Send and Forward When sending a FAX, FTP, SMB, i-FAX or a E-mail job, Send and Forward automatically forwards the same job to a destination specified. General 1. Click Send and Forward under Function Settings on the navigation menu. The Send and Forward Settings page opens. 2. This section includes the following items for configuration. Send and Forward Switches Send and Forward On or Off. Rule Selects any of E-mail, Folder (SMB), Folder (FTP), FAX, i-FAX (Via server - On), and i-FAX (Via server - Off) to apply the Send and Forward. 3. Click Submit button. Destination 1. Click Send and Forward under Function Settings on the navigation menu. The Send and Forward Settings page opens. 2. This section includes the following items for configuration. Address Book Click Address Book icon and select a type and a name of the address on the address page. E-mail Email forwards the E-mail to the E-mail address entered. Click E-mail icon to specify an E-mail address. You can change the address by clicking Address Book. Click Submit button to finalize settings. Folder Forwards and saves a job in a folder (SMB or FTP). Enter the Host Name, Port Number, path to a folder, Login User Name, and the Login Password. You can confirm the connection status by clicking Test button. You can also edit an address by clicking Address Book. Click Submit button to finalize settings. If you use the host name, you must first specify the DNS server information. Delete Deletes the address selected. 3. Click Submit button. User Guide 49
-
 1
1 -
2
-
3
-
4
-
5
-
6
-
7
-
8
-
9
-
10
-
11
-
12
-
13
-
14
-
15
-
16
-
17
-
18
-
19
-
20
-
21
-
22
-
23
-
24
-
25
-
26
-
27
-
28
-
29
-
30
-
31
-
32
-
33
-
34
-
35
-
36
-
37
-
38
-
39
-
40
-
41
-
42
-
43
-
44
-
45
-
46
-
47
-
 48
48 -
 49
49 -
 50
50 -
 51
51 -
 52
52 -
 53
53 -
 54
54 -
 55
55 -
 56
56 -
 57
57 -
 58
58 -
59
-
60
-
61
-
62
-
63
-
64
-
65
-
66
-
67
-
68
-
69
-
70
-
71
-
72
-
73
-
74
-
75
-
76
-
77
-
78
-
79
-
80
-
81
-
82
-
83
-
84
-
85
-
86
-
87
-
88
-
89
-
90
-
91
-
92
-
93
-
94
-
95
-
96
-
97
-
98
-
99
-
100
-
101
-
102
-
103
-
104
-
105
-
106
-
107
-
108
-
109
-
110
-
111
-
112
-
113
-
114
 |
 |
