LG LMCN185HV Installation Instructions - Page 8
Installation of Indoor, Outdoor Unit
 |
View all LG LMCN185HV manuals
Add to My Manuals
Save this manual to your list of manuals |
Page 8 highlights
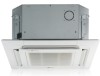
Installation of Indoor, Outdoor Unit Installation of Indoor, Outdoor Unit Read completely, then follow step by step. Select the best location Indoor unit 1. Do not have any heat or steam near the unit. 2. Select a place where there are no obstacles in front of the unit. 3. Make sure that condensation drainage can be conveniently routed away. 4. Do not install near a doorway. 5. Ensure the unit is unobstructed, allow proper space on all sides according to the arrows and distance measurements in the figures. 6. Use a Metal Detector or Metal Scanner to locate studs to prevent unnecessary damage to the wall. [Cealing Concealed Duct Type] Top view [Standard /Artcool Mirror Type] More than 100(3 15/16) More than 200(7 7/8) More than 2300(90 9/16) More than 100(3 15/16) Unit:mm(inch) [Cealing Cassette Type] 1000(39 3/8) 1500 (59 1/16) or more Above 2500(98 7/16) 3300(129 15/16) or less 600(23 19/32) Front Front view 600(23 19/32) 7 5/16 H=13/16 or more Ceiling False ceiling 1500(59 1/16)or more 20(13/16) or more False ceiling 1500(59 1/16) or more Floor A B Capacity(Btu/h class) 9/12k 18k A 600(23 5/8) 600(23 5/8) B 900(35 15/32) 1100(43 5/16) 8 Multi Air Conditioner Unit:mm(inch)
-
 1
1 -
2
-
 3
3 -
 4
4 -
 5
5 -
 6
6 -
 7
7 -
 8
8 -
 9
9 -
 10
10 -
 11
11 -
 12
12 -
 13
13 -
14
-
15
-
16
-
17
-
18
-
19
-
20
-
21
-
22
-
23
-
24
-
25
-
26
-
27
-
28
-
29
-
30
-
31
-
32
-
33
-
34
-
35
-
36
-
37
-
38
-
39
-
40
-
41
-
42
-
43
-
44
-
45
-
46
-
47
-
48
-
49
-
50
-
51
-
52
-
53
-
54
-
55
-
56
-
57
-
58
-
59
-
60
-
61
-
62
-
63
-
64
-
65
-
66
-
67
-
68
-
69
-
70
-
71
-
72
-
73
-
74
-
75
-
76
-
77
-
78
-
79
-
80
-
81
-
82
-
83
-
84
-
85
-
86
-
87
-
88
-
89
-
90
-
91
-
92
-
93
-
94
-
95
-
96
-
97
-
98
-
99
-
100
-
101
-
102
-
103
-
104
-
105
-
106
-
107
-
108
-
109
-
110
-
111
-
112
-
113
-
114
-
115
-
116
-
117
-
118
-
119
-
120
-
121
-
122
-
123
-
124
-
125
-
126
-
127
-
128
-
129
-
130
-
131
-
132
-
133
-
134
-
135
-
136
-
137
 |
 |
