LG NB3730A Owners Manual - Page 34
Using Home Network Server for PC, Installing Nero MediaHome 4 Essentials, Sharing files and folders
 |
View all LG NB3730A manuals
Add to My Manuals
Save this manual to your list of manuals |
Page 34 highlights
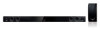
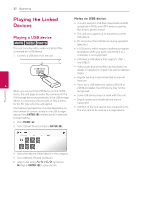
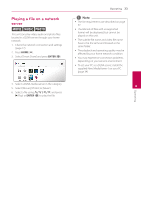
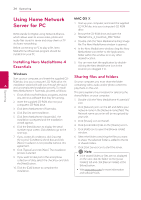
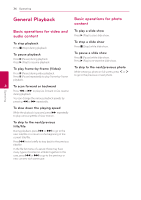
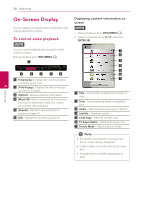
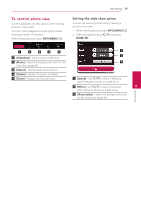
34 Operating Operating Using Home Network Server for PC MAC OS X 1. Start up your computer, and insert the supplied CD-ROM disc into your computer's CD-ROM drive. DLNA stands for Digital Living Network Alliance, which allows users to access video, photo and audio files stored in server and enjoy them on TV via home networking. Before connecting to PC to play a file , Nero MediaHome 4 Essentials program should be installed on your PC. Installing Nero MediaHome 4 Essentials 2. Browse the CD-ROM drive and open the "MediaHome_4_Essentials_MAC" folder. 3. Double-click the "Nero MediaHome.dmg" image file. The Nero MediaHome window is opened. 4. In the Nero MediaHome window, drag the Nero MediaHome icon either to the Applications folder within the window or to any other desired location. 5. You can now start the application by doubleclicking the Nero MediaHome icon in the location you dragged it to. Windows Start up your computer, and insert the supplied CD- Sharing files and folders ROM disc into your computer's CD-ROM drive. An On your computer, you must share the folder 4 installation wizard will walk you through the quick and uncomplicated installation process. To install containing video, audio and/or photo content to play them on this unit. Nero MediaHome 4 Essentials, proceed as follows: 1. Close all Microsoft Windows programs and exit any anti-virus software that may be running. 2. Insert the supplied CD-ROM disc into your computer's CD-ROM drive. 3. Click [Nero MediaHome 4 Essentials]. 4. Click [Run] to start installation. This parts explains the procedure for selecting the shared folders on your computer. 1. Double-click the "Nero MediaHome 4 Essentials" icon. 2. Click [Network] icon on the left and define your network name in the [Network name] field. The Network name you enter will be recognized by 5. Click [Nero MediaHome 4 Essentials]. The your unit. installation is prepared and the installation wizard appears. 6. Click the [Next] button to display the serial number input screen. Click [Next] to go to the 3. Click [Shares] icon on the left. 4. Click [Local Folders] tab on the [Shares] screen. 5. Click [Add] icon to open the [Browse Folder] next step. window. 7. If you accept all conditions, click [I accept the License Conditions] check box and click [Next]. Installation is not possible without this agreement. 8. Click [Typical] and click [Next]. The installation process is started. 9. If you want to take part in the anonymous collection of data, select the check box and click the [Next] button. 10. Click the [Exit] button to complete the installation. 6. Select the folder containing the files you want to share. The selected folder is added to the list of shared folders. 7. Click [Start Server] icon to start the server. ,,Note yy If the shared folders or files are not displayed on the unit, click the folder on the [Local Folders] tab and click [Rescan Folder] at the [More] button. yy Visit www.nero.com for more information and software tools.
-
 1
1 -
2
-
3
-
4
-
5
-
6
-
7
-
8
-
9
-
10
-
11
-
12
-
13
-
14
-
15
-
16
-
17
-
18
-
19
-
20
-
21
-
22
-
23
-
24
-
25
-
26
-
27
-
28
-
 29
29 -
 30
30 -
 31
31 -
 32
32 -
 33
33 -
 34
34 -
 35
35 -
 36
36 -
 37
37 -
 38
38 -
 39
39 -
40
-
41
-
42
-
43
-
44
-
45
-
46
-
47
-
48
-
49
-
50
-
51
-
52
-
53
-
54
-
55
-
56
-
57
-
58
-
59
-
60
-
61
-
62
-
63
-
64
-
65
-
66
 |
 |