Lenovo 7515-J9U User Guide - Page 40
Replacing the primary hard disk drive, Important
 |
UPC - 884942137211
View all Lenovo 7515-J9U manuals
Add to My Manuals
Save this manual to your list of manuals |
Page 40 highlights
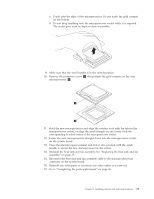
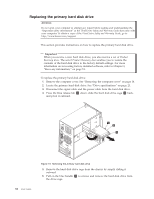
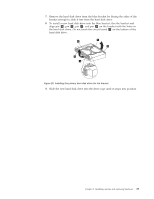
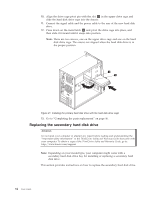
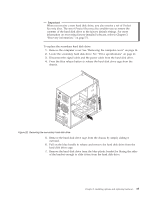
Replacing the primary hard disk drive Attention Do not open your computer or attempt any repair before reading and understanding the "Important safety information" in the ThinkCentre Safety and Warranty Guide that came with your computer. To obtain a copy of the ThinkCentre Safety and Warranty Guide, go to: http://www.lenovo.com/support This section provides instructions on how to replace the primary hard disk drive. Important When you receive a new hard disk drive, you also receive a set of Product Recovery discs. The set of Product Recovery discs enables you to restore the contents of the hard disk drive to the factory default settings. For more information on recovering factory-installed software, refer to Chapter 3, "Recovery information," on page 51. To replace the primary hard disk drive: 1. Remove the computer cover. See "Removing the computer cover" on page 14. 2. Locate the primary hard disk drive. See "Drive specifications" on page 21. 3. Disconnect the signal cable and the power cable from the hard disk drive. 4. Press the blue release tab 1 down, slide the hard disk drive cage 2 back, and pivot it outward. 32 User Guide Figure 19. Removing the primary hard disk drive 5. Remove the hard disk drive cage from the chassis by simply sliding it outward. 6. Pull on the blue handle 3 to release and remove the hard disk drive from the drive cage.
-
 1
1 -
2
-
3
-
4
-
5
-
6
-
7
-
8
-
9
-
10
-
11
-
12
-
13
-
14
-
15
-
16
-
17
-
18
-
19
-
20
-
21
-
22
-
23
-
24
-
25
-
26
-
27
-
28
-
29
-
30
-
31
-
32
-
33
-
34
-
 35
35 -
 36
36 -
 37
37 -
 38
38 -
 39
39 -
 40
40 -
 41
41 -
 42
42 -
 43
43 -
 44
44 -
 45
45 -
46
-
47
-
48
-
49
-
50
-
51
-
52
-
53
-
54
-
55
-
56
-
57
-
58
-
59
-
60
-
61
-
62
-
63
-
64
-
65
-
66
-
67
-
68
-
69
-
70
-
71
-
72
-
73
-
74
-
75
-
76
-
77
-
78
-
79
-
80
-
81
-
82
-
83
-
84
-
85
-
86
-
87
-
88
-
89
-
90
-
91
-
92
 |
 |
