Lenovo ThinkServer RD330 Operating System Installation Guide - ThinkServer RD3 - Page 8
to install the SQL Server 2008 R2 for Small Business, R2 for Small Business Setup support files.
 |
View all Lenovo ThinkServer RD330 manuals
Add to My Manuals
Save this manual to your list of manuals |
Page 8 highlights
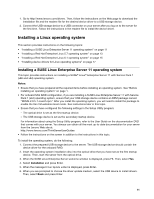
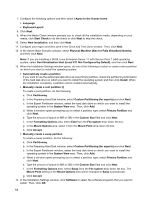
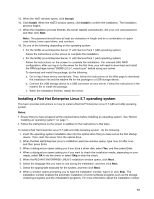
6. The Setup Support Rules will identify the problems that might occur when you install the SQL Server 2008 R2 for Small Business Setup support files. • If no failure is reported, click OK. • If any failure is reported, correct the failure and then click OK. 7. In the Setup Support Files window, click Install to install the SQL Server 2008 R2 for Small Business Setup support files. 8. The Setup Support Rules will identify the problems that might occur during the installation. Correct any failure that is reported, and then click Next. 9. In the Installation Type window, select one of the following to specify whether you want to perform a new installation or add features to an existing instance of SQL Server 2008 R2, and then click Next. • New installation or add shared features • Add features to an existing instance of SQL Sever 2008 R2 10. In the Product Key window, select one of the following to specify the edition of SQL Server 2008 R2 for Small Business, and then click Next. • Specify a free edition: This option enables you to specify a free edition of SQL Server 2008 R2 for Small Business, such as Evaluation or Express. Evaluation has the largest set of SQL Server 2008 R2 for Small Business features, and it is activated with a 180-day expiration. To upgrade from one edition to another, run the Edition Upgrade Wizard. • Enter the product key: This option requires you to enter a 25-character product key of SQL Server 2008 R2 for Small Business. The key information is available on the Microsoft Certificate of Authenticity label or product packaging. 11. In the License Terms window, click I accept the license terms, and then click Next. 12. In the Setup Role window, select one of the following to specify which feature components you want to install, and then click Next. • SQL Server Feature Installation • SQL Server PowerPivot for SharePoint • All Features With Defaults Note: The following steps are based on the scenario that SQL Server Feature Installation is selected in this step. 13. In the Feature Selection window, select the Evaluation features to install, and then click Next. 14. The Installation Rules will identify if the installation process will be blocked. Correct any failure that is reported, and then click Next. 15. In the Instance Configuration window, specify Name instance and Instance ID, and then click Next. 16. In the Disk Space Requirement window, review the disk space summary for the SQL Server 2008 R2 features you selected to ensure that you have enough disk space, and then click Next. 17. In the Server Configuration window, specify the service accounts and collation configuration, and then click Next. 18. In the Database Engine Configuration window, specify the Database Engine authentication security mode, administrators, and data directories by clicking the Add Current User tab, and then click Next. 19. In the Error Reporting window, specify the information that you would like to be sent to Microsoft automatically to improve future releases of SQL Server 2008 R2, and then click Next. 20. The Installation Configuration Rules will identify if the installation process will be blocked. Correct any failure that is reported, and then click Next. 21. In the Ready to Install window, verify the SQL Server 2008 R2 for Small Business features to be installed and click Install. 8
-
 1
1 -
2
-
 3
3 -
 4
4 -
 5
5 -
 6
6 -
 7
7 -
 8
8 -
 9
9 -
 10
10 -
 11
11 -
 12
12 -
 13
13 -
14
-
15
-
16
-
17
-
18
-
19
-
20
 |
 |