Lexmark 560n User's Guide - Page 30
Setting the date, Select Function, Admin Menu, System Settings, Clock Settings, Set Date, Set Time
 |
UPC - 734646059534
View all Lexmark 560n manuals
Add to My Manuals
Save this manual to your list of manuals |
Page 30 highlights
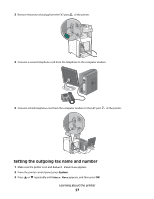
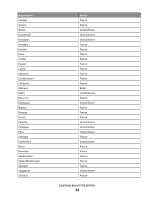
If you live in Slovenia Sri Lanka Trinidad and Tobago Tunisia United Arab Emirates Uruguay Venezuela Vietnam Virgin Islands Select France France United States France France United States United States France United States Setting the date You can set the date so that the correct date is printed on every fax you send. If there is a power failure, you may have to reset the date. To set the date: 1 Make sure the printer is on and Select Function appears. 2 From the printer control panel, press System. 3 Press or repeatedly until Admin Menu appears, and then press OK. 4 Press or repeatedly until System Settings appears, and then press OK. 5 Press or repeatedly until Clock Settings appears, and then press OK. 6 Press or repeatedly until Set Date appears, and then press OK. 7 Use the keypad to enter the date, and then press or to move to the next digit. After the date is entered, press OK. 8 Press repeatedly until Select Function appears. Setting the time You can set the time so that the correct time is printed on every fax you send. If there is a power failure, you may have to reset the time. To set the time: 1 Make sure the printer is on and Select Function appears. 2 From the printer control panel, press System. 3 Press or repeatedly until Admin Menu appears, and then press OK. 4 Press or repeatedly until System Settings appears, and then press OK. 5 Press or repeatedly until Clock Settings appears, and then press OK. 6 Press or repeatedly until Set Time appears, and then press OK. Learning about the printer 30
-
 1
1 -
2
-
3
-
4
-
5
-
6
-
7
-
8
-
9
-
10
-
11
-
12
-
13
-
14
-
15
-
16
-
17
-
18
-
19
-
20
-
21
-
22
-
23
-
24
-
 25
25 -
 26
26 -
 27
27 -
 28
28 -
 29
29 -
 30
30 -
 31
31 -
 32
32 -
 33
33 -
 34
34 -
 35
35 -
36
-
37
-
38
-
39
-
40
-
41
-
42
-
43
-
44
-
45
-
46
-
47
-
48
-
49
-
50
-
51
-
52
-
53
-
54
-
55
-
56
-
57
-
58
-
59
-
60
-
61
-
62
-
63
-
64
-
65
-
66
-
67
-
68
-
69
-
70
-
71
-
72
-
73
-
74
-
75
-
76
-
77
-
78
-
79
-
80
-
81
-
82
-
83
-
84
-
85
-
86
-
87
-
88
-
89
-
90
-
91
-
92
-
93
-
94
-
95
-
96
-
97
-
98
-
99
-
100
-
101
-
102
-
103
-
104
-
105
-
106
-
107
-
108
-
109
-
110
-
111
-
112
-
113
-
114
-
115
-
116
-
117
-
118
-
119
-
120
-
121
-
122
-
123
-
124
-
125
-
126
-
127
-
128
-
129
-
130
-
131
-
132
-
133
-
134
-
135
-
136
-
137
-
138
-
139
-
140
-
141
-
142
-
143
-
144
-
145
-
146
-
147
-
148
-
149
-
150
-
151
-
152
-
153
-
154
-
155
-
156
-
157
-
158
-
159
-
160
-
161
-
162
-
163
-
164
-
165
-
166
-
167
-
168
-
169
-
170
-
171
-
172
-
173
-
174
-
175
-
176
-
177
-
178
-
179
-
180
-
181
-
182
-
183
-
184
-
185
-
186
-
187
-
188
-
189
-
190
-
191
-
192
-
193
-
194
-
195
-
196
-
197
-
198
-
199
-
200
-
201
-
202
-
203
-
204
-
205
-
206
-
207
-
208
-
209
-
210
 |
 |
