Lexmark C540 Service Manual - Page 43
xx, 4xx, Select, Menus, Network/Ports, USB Menu, USB Buffer, User primary, message, Explanation - firmware error
 |
View all Lexmark C540 manuals
Add to My Manuals
Save this manual to your list of manuals |
Page 43 highlights
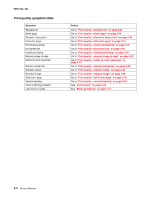
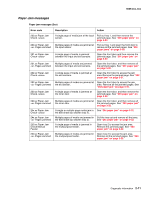
5025-2xx, 4xx User primary message 54 Standard Network Software Error 54 Network Software Error 56 Standard USB Port Disabled 58 Too many Flash Options Installed 58 Too Many Trays Installed 59 Incompatible Tray 82 Replace Waste Toner 82 Waste Toner Nearly Full 82 Waste Toner Missing Explanation The printer detects a network port, but cannot communicate with it. The printer disables all communication to the associated network interface. Try one or more of the following: • Press Select ( ) to clear the message and continue printing. The job may not print correctly. • Upgrade the network firmware in the printer or the print server. • Turn the printer power off and then back on to reset the printer. The printer disables all communications to the associated network interface. No data may be received or sent from or to the associated interface. • Press Select ( ) to clear the message and continue printing. The job may not print correctly. • Turn the printer power off and then back on to reset the printer. • Upgrade the network firmware in the printer or the print server. This message may appear when data is sent to the printer across a USB port, but the port is disabled. Note: Once the error is displayed the first time, reporting of further errors is suppressed until the printer is reset or menus are entered. The following actions can be taken: • Press Select ( ) to clear the message. Any data received on the USB port is discarded. • Press Menus ( ) to access the Administrative Menus. Make sure the USB Buffer menu item is not set to Disabled. (Press Menus ( ) to access the Administrative Menus, select Network/Ports, USB Menu, and USB Buffer.) Too many optional flash memory cards or optional firmware cards are installed on the printer. 1. Turn off and unplug the printer. 2. Remove the excess flash memory or optional firmware cards. 3. Plug in the printer, and turn it on. Too many tray are installed. 1. Turn off and unplug the printer. 2. Remove the additional trays. 3. Plug in the printer, and turn it on. 1. Turn off and unplug the printer. 2. Remove the specified incompatible tray. 3. Plug in the printer, and turn it on. Replace the waste toner bottle to clear the message and continue printing. See "Waste toner bottle removal" on page 4-60. Note: The printer will not continue until the waste toner bottle is replaced. Try one or more of the following: • Replace the waste toner bottle, and then press Select ( ) to clear the message and continue printing. See "Waste toner bottle removal" on page 4-60. • Press Select ( ) to clear the message and continue printing. • Order the waste toner bottle so it will be available when the replacement message is displayed. Once the replacement message is displayed, the printer will not continue until the waste toner is replaced. Install a waste toner bottle, and then press Select ( ) to clear the message and continue printing. See "Waste toner bottle removal" on page 4-60. Diagnostic information 2-9
-
 1
1 -
2
-
3
-
4
-
5
-
6
-
7
-
8
-
9
-
10
-
11
-
12
-
13
-
14
-
15
-
16
-
17
-
18
-
19
-
20
-
21
-
22
-
23
-
24
-
25
-
26
-
27
-
28
-
29
-
30
-
31
-
32
-
33
-
34
-
35
-
36
-
37
-
 38
38 -
 39
39 -
 40
40 -
 41
41 -
 42
42 -
 43
43 -
 44
44 -
 45
45 -
 46
46 -
 47
47 -
 48
48 -
49
-
50
-
51
-
52
-
53
-
54
-
55
-
56
-
57
-
58
-
59
-
60
-
61
-
62
-
63
-
64
-
65
-
66
-
67
-
68
-
69
-
70
-
71
-
72
-
73
-
74
-
75
-
76
-
77
-
78
-
79
-
80
-
81
-
82
-
83
-
84
-
85
-
86
-
87
-
88
-
89
-
90
-
91
-
92
-
93
-
94
-
95
-
96
-
97
-
98
-
99
-
100
-
101
-
102
-
103
-
104
-
105
-
106
-
107
-
108
-
109
-
110
-
111
-
112
-
113
-
114
-
115
-
116
-
117
-
118
-
119
-
120
-
121
-
122
-
123
-
124
-
125
-
126
-
127
-
128
-
129
-
130
-
131
-
132
-
133
-
134
-
135
-
136
-
137
-
138
-
139
-
140
-
141
-
142
-
143
-
144
-
145
-
146
-
147
-
148
-
149
-
150
-
151
-
152
-
153
-
154
-
155
-
156
-
157
-
158
-
159
-
160
-
161
-
162
-
163
-
164
-
165
-
166
-
167
-
168
-
169
-
170
-
171
-
172
-
173
-
174
-
175
-
176
-
177
-
178
-
179
-
180
-
181
-
182
-
183
-
184
-
185
-
186
-
187
-
188
-
189
-
190
-
191
-
192
-
193
-
194
-
195
-
196
-
197
-
198
-
199
-
200
-
201
-
202
-
203
-
204
-
205
-
206
-
207
-
208
-
209
-
210
-
211
-
212
-
213
-
214
-
215
-
216
-
217
-
218
-
219
-
220
-
221
-
222
-
223
-
224
-
225
-
226
-
227
-
228
-
229
-
230
-
231
-
232
-
233
-
234
-
235
-
236
 |
 |