Lexmark MX617 User Guide - Page 125
Scanning, Using Scan to Network, Scanning to an FTP address, Creating shortcuts
 |
View all Lexmark MX617 manuals
Add to My Manuals
Save this manual to your list of manuals |
Page 125 highlights
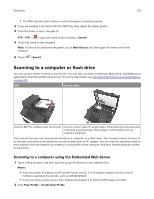
Scanning 125 Scanning You can use the printer to send a file to an FTP address. You can type the e‑mail address, use a shortcut number, or use the address book. You can also use the Multi Send or MyShortcut application from the printer home screen. For more information, see "Activating the home screen applications" on page 23. Using Scan to Network Scan to Network lets you scan your documents to network destinations specified by your system support person. After the destinations (shared network folders) have been established on the network, the setup process for the application involves installing and configuring the application on the appropriate printer using its Embedded Web Server. For more information, see "Setting up Scan to Network" on page 25. Scanning to an FTP address Creating shortcuts Instead of entering the entire FTP site address on the printer control panel each time you want to send a document to an FTP server, you can create a permanent FTP destination and assign a shortcut number. There are two methods for creating shortcut numbers: using the Embedded Web Server and using the printer control panel. Creating an FTP shortcut using the Embedded Web Server 1 Open a Web browser, and then type the printer IP address in the address field. Notes: • View the printer IP address on the printer home screen. The IP address appears as four sets of numbers separated by periods, such as 123.123.123.123. • If you are using a proxy server, then temporarily disable it to load the Web page correctly. 2 Navigate to: Settings > Other Settings area > Manage Shortcuts > FTP Shortcut Setup 3 Enter the appropriate information. Note: A password may be required. If you do not have an ID and password, then contact your system support person. 4 Enter a shortcut number. Note: If you enter a number that is already in use, then you are prompted to select another number. 5 Click Add.
-
 1
1 -
2
-
3
-
4
-
5
-
6
-
7
-
8
-
9
-
10
-
11
-
12
-
13
-
14
-
15
-
16
-
17
-
18
-
19
-
20
-
21
-
22
-
23
-
24
-
25
-
26
-
27
-
28
-
29
-
30
-
31
-
32
-
33
-
34
-
35
-
36
-
37
-
38
-
39
-
40
-
41
-
42
-
43
-
44
-
45
-
46
-
47
-
48
-
49
-
50
-
51
-
52
-
53
-
54
-
55
-
56
-
57
-
58
-
59
-
60
-
61
-
62
-
63
-
64
-
65
-
66
-
67
-
68
-
69
-
70
-
71
-
72
-
73
-
74
-
75
-
76
-
77
-
78
-
79
-
80
-
81
-
82
-
83
-
84
-
85
-
86
-
87
-
88
-
89
-
90
-
91
-
92
-
93
-
94
-
95
-
96
-
97
-
98
-
99
-
100
-
101
-
102
-
103
-
104
-
105
-
106
-
107
-
108
-
109
-
110
-
111
-
112
-
113
-
114
-
115
-
116
-
117
-
118
-
119
-
 120
120 -
 121
121 -
 122
122 -
 123
123 -
 124
124 -
 125
125 -
 126
126 -
 127
127 -
 128
128 -
 129
129 -
 130
130 -
131
-
132
-
133
-
134
-
135
-
136
-
137
-
138
-
139
-
140
-
141
-
142
-
143
-
144
-
145
-
146
-
147
-
148
-
149
-
150
-
151
-
152
-
153
-
154
-
155
-
156
-
157
-
158
-
159
-
160
-
161
-
162
-
163
-
164
-
165
-
166
-
167
-
168
-
169
-
170
-
171
-
172
-
173
-
174
-
175
-
176
-
177
-
178
-
179
-
180
-
181
-
182
-
183
-
184
-
185
-
186
-
187
-
188
-
189
-
190
-
191
-
192
-
193
-
194
-
195
-
196
-
197
-
198
-
199
-
200
-
201
-
202
-
203
-
204
-
205
-
206
-
207
-
208
-
209
-
210
-
211
-
212
-
213
-
214
-
215
-
216
-
217
-
218
-
219
-
220
-
221
-
222
-
223
-
224
-
225
-
226
-
227
-
228
-
229
-
230
-
231
-
232
-
233
-
234
-
235
-
236
-
237
-
238
-
239
-
240
-
241
-
242
-
243
-
244
-
245
-
246
-
247
-
248
-
249
-
250
-
251
-
252
-
253
-
254
-
255
-
256
-
257
-
258
-
259
-
260
-
261
-
262
-
263
-
264
-
265
-
266
-
267
-
268
-
269
-
270
-
271
-
272
-
273
-
274
-
275
-
276
-
277
-
278
-
279
-
280
-
281
-
282
-
283
-
284
-
285
-
286
-
287
-
288
-
289
-
290
-
291
-
292
-
293
-
294
-
295
-
296
-
297
-
298
-
299
-
300
-
301
-
302
-
303
-
304
-
305
-
306
-
307
-
308
-
309
-
310
-
311
-
312
-
313
-
314
-
315
-
316
-
317
-
318
-
319
-
320
-
321
-
322
-
323
-
324
-
325
-
326
-
327
-
328
-
329
-
330
-
331
-
332
-
333
-
334
-
335
-
336
-
337
-
338
-
339
-
340
-
341
-
342
-
343
-
344
-
345
 |
 |
