Lexmark MX6500e 6500e Multi Send Administrator's Guide - Page 6
Remote Copy Settings, Fax Settings, Scan Settings
 |
View all Lexmark MX6500e 6500e manuals
Add to My Manuals
Save this manual to your list of manuals |
Page 6 highlights
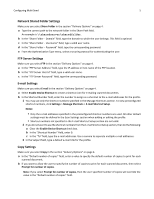
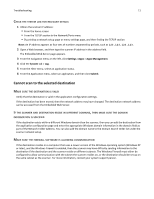
Configuring Multi Send 6 Remote Copy Settings Make sure you select Remote Copy in the section "Delivery Options" on page 4. a In the "Remote Printer Address(es)" field, type the IP address of the remote printer where you want to send the scanned document. Use a comma to separate multiple IP addresses. b In the "Default number of copies" field, enter a value to specify the default number of copies to print for each scanned document. c If you want to allow the user to specify the number of copies to print for each scanned document, then select Prompt for number of copies. Note: If you select Prompt for number of copies, then the user‑specified number of copies will override the value in the "Default number of copies" field. Fax Settings Notes: • Make sure you select Fax in the section "Delivery Options" on page 4. • When you scan a color document for faxing, the faxed document will be in black and white. • To view the complete list of supported printers for each version of the Embedded Web Server, see the Readme file. a Select Enable Device Shortcut to create a shortcut icon for faxing the scanned document. b In the "Shortcut Number" field, enter the number to assign as a shortcut to the fax numbers. 1 You may use only the shortcut numbers specified in the Manage Shortcuts section. To view preconfigured shortcut numbers, click Settings > Manage Shortcuts > Fax Shortcut Setup. Notes: • Only the fax numbers specified in the preconfigured shortcut numbers are used. All other settings must be defined in the Scan Settings section when adding or editing the profile. • Shortcut numbers not specified in the Fax Shortcut Setup section are not valid. 2 If you do not want to use the shortcut numbers from the Fax Shortcut Setup section, then do the following: a Clear the Enable Device Shortcut check box. b In the "Shortcut Number" field, enter 0. c In the "Fax Number(s)" field, enter the default fax number for the profile. Note: If you clear the Enable Device Shortcut check box but you do not enter a value in the Fax Number(s) field, then the fax settings appear on the scanner home screen. Scan Settings • Show Scan Settings-Select this option to allow manual adjustment of scan settings. • Show Scan Preview-Select this option to let users preview the scanned document before scanning. • Scan Sides (Duplex)-Select 1 sided to specify that the device will scan only one side of a document. If you want the device to scan both sides of the document, then do either of the following: - Select 2 sided (Short Edge) to scan two-sided documents that are bound along the short edge of the paper. - Select 2 sided (Long Edge) to scan two-sided documents that are bound along the long edge of the paper. • Scan Resolution-Adjust the quality of the scanned document. • Scan Color-Select On to scan the document in color, or Off to scan it in black and white.
-
 1
1 -
 2
2 -
 3
3 -
 4
4 -
 5
5 -
 6
6 -
 7
7 -
 8
8 -
 9
9 -
 10
10 -
 11
11 -
 12
12 -
13
-
14
-
15
 |
 |