Lexmark MX718 Embedded Web Server--Security: Administrator s Guide - Page 26
Creating a new device certificate, Viewing, downloading, and deleting a certificate
 |
View all Lexmark MX718 manuals
Add to My Manuals
Save this manual to your list of manuals |
Page 26 highlights
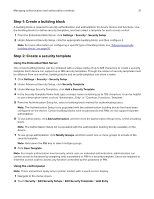
Managing certificates and other settings 26 7 Follow the CA certificate request process as defined for the CA. A sample request is shown in "Appendix B: CA‑Signed Device Certificate creation" on page 66. Note: The result is a CA‑signed device certificate file (in .pem format). Save this file on your computer for use in the next steps. 8 From the Embedded Web Server, return to the "default" Device Certificate Management page, and then click Install Signed Certificate. 9 Click Browse, and then select the CA‑signed device certificate file that was created in step 8. 10 Click Submit. Note: This completes the process of creating and installing a signed printer certificate. The printer can now present a valid CA‑signed certificate to systems to which it attempts to negotiate an SSL or IPSec connection. Creating a new device certificate 1 From the Embedded Web Server, click Settings > Security > Certificate Management. 2 Click Device Certificate Management > New. 3 Enter values in the appropriate fields: • Friendly Name-Type a name for the certificate (64‑character maximum). • Common Name-Type a name for the device (128‑character maximum). Note: Leave this field blank if you want to use the host name for the device. • Organization Name-Type the name of the company or organization issuing the certificate (128‑character maximum). • Unit Name-Type the name of the unit within the company or organization issuing the certificate (128‑character maximum). • Country/Region-Type the country or region where the company or organization issuing the certificate is located (2‑character maximum). • Province Name-Type the name of the province or state where the company or organization issuing the certificate is located (128‑character maximum). • City Name-Type the name of the city where the company or organization issuing the certificate is located (128‑character maximum). • Subject Alternate Name-Type the alternate name and prefix that conforms to RFC 2459. For example, type an IP address using the format IP:1.2.3.4, or a DNS address using the format DNS:ldap.company.com. Leave this field blank if you want to use the IPv4 address (128‑character maximum). 4 Click Generate New Certificate. Viewing, downloading, and deleting a certificate 1 From the Embedded Web Server, click Settings > Security > Certificate Management > Device Certificate Management. 2 Select a certificate from the list. The details of the certificate appear in the Device Certificate Management window.
-
 1
1 -
2
-
3
-
4
-
5
-
6
-
7
-
8
-
9
-
10
-
11
-
12
-
13
-
14
-
15
-
16
-
17
-
18
-
19
-
20
-
 21
21 -
 22
22 -
 23
23 -
 24
24 -
 25
25 -
 26
26 -
 27
27 -
 28
28 -
 29
29 -
 30
30 -
 31
31 -
32
-
33
-
34
-
35
-
36
-
37
-
38
-
39
-
40
-
41
-
42
-
43
-
44
-
45
-
46
-
47
-
48
-
49
-
50
-
51
-
52
-
53
-
54
-
55
-
56
-
57
-
58
-
59
-
60
-
61
-
62
-
63
-
64
-
65
-
66
-
67
-
68
-
69
-
70
-
71
-
72
-
73
-
74
-
75
-
76
-
77
-
78
-
79
-
80
-
81
-
82
-
83
-
84
-
85
-
86
-
87
-
88
-
89
-
90
-
91
-
92
-
93
 |
 |
