Lexmark P350 User's Guide - Page 24
Printing photos, Printing photos using the computer, Printing photos using Print Properties
 |
View all Lexmark P350 manuals
Add to My Manuals
Save this manual to your list of manuals |
Page 24 highlights
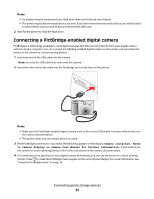
Printing photos You can use the following paper types with your printer: • Lexmark Perfectfinish Photo Paper • Lexmark Photo Paper • Photo/glossy paper Notes: • For best results, use Lexmark Perfectfinish Photo Paper or Lexmark Photo Paper. • Do not use Lexmark Premium Photo Paper. Your print cartridge is not compatible with this type of paper. Printing photos using the computer Printing photos using Print Properties From a Windows program, you can use Print Properties to print photos stored on your computer. 1 Load photo paper, with the glossy or printable side facing you. (If you are not sure which side is the printable side, see the instructions that came with the paper.) For more information, see "Loading paper" on page 19. 2 From the computer software application, click File Œ Print. 3 Click Properties, Preferences, Options, or Setup. 4 From the Quality/Copies tab, select Photo. 5 From the Paper Type menu, select a paper type. 6 From the Paper Setup tab, select the paper size and the orientation of the photo. 7 Click OK. 8 Click OK or Print. Note: To prevent smudging or scratching, avoid touching the printed surface with your fingers or sharp objects. For best results, remove each printed sheet individually from the paper exit tray, and allow the prints to dry at least 24 hours before stacking, displaying, or storing. Printing photos using Fast Pics You can use Fast Pics to retrieve, edit, and print photos stored on a memory device or on your computer. 1 Load photo paper, with the glossy or printable side facing you. (If you are not sure which side is the printable side, see the instructions that came with the paper.) For more information, see "Loading paper" on page 19. 2 Insert a memory card or flash drive. For more information, see "Inserting a memory card" on page 20 or "Inserting a flash drive" on page 21. The Fast Pics software automatically launches on your computer. 3 If necessary, click Change Folder to browse to the location where your photos are stored. 4 Click each photo you want to print. 5 If you want to edit the photos, click Edit. Printing photos 24
-
 1
1 -
2
-
3
-
4
-
5
-
6
-
7
-
8
-
9
-
10
-
11
-
12
-
13
-
14
-
15
-
16
-
17
-
18
-
 19
19 -
 20
20 -
 21
21 -
 22
22 -
 23
23 -
 24
24 -
 25
25 -
 26
26 -
 27
27 -
 28
28 -
 29
29 -
30
-
31
-
32
-
33
-
34
-
35
-
36
-
37
-
38
-
39
-
40
-
41
-
42
-
43
-
44
-
45
-
46
-
47
-
48
-
49
-
50
-
51
-
52
-
53
-
54
-
55
-
56
-
57
-
58
-
59
-
60
-
61
-
62
 |
 |
