Lexmark X2330 User's Guide - Page 20
Using the Lexmark Photo Editor, Saved Images - windows 7
 |
View all Lexmark X2330 manuals
Add to My Manuals
Save this manual to your list of manuals |
Page 20 highlights
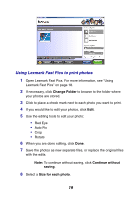
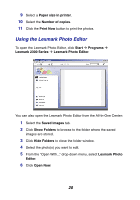
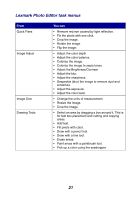
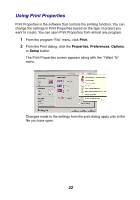
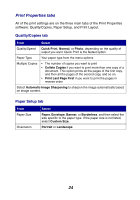
9 Select a Paper size in printer. 10 Select the Number of copies. 11 Click the Print Now button to print the photos. Using the Lexmark Photo Editor To open the Lexmark Photo Editor, click Start Æ Programs Æ Lexmark 2300 Series Æ Lexmark Photo Editor. You can also open the Lexmark Photo Editor from the All-In-One Center: 1 Select the Saved Images tab. 2 Click Show Folders to browse to the folder where the saved images are stored. 3 Click Hide Folders to close the folder window. 4 Select the photo(s) you want to edit. 5 From the "Open With..." drop-down menu, select Lexmark Photo Editor. 6 Click Open Now. 20
-
 1
1 -
2
-
3
-
4
-
5
-
6
-
7
-
8
-
9
-
10
-
11
-
12
-
13
-
14
-
 15
15 -
 16
16 -
 17
17 -
 18
18 -
 19
19 -
 20
20 -
 21
21 -
 22
22 -
 23
23 -
 24
24 -
 25
25 -
26
-
27
-
28
-
29
-
30
-
31
-
32
-
33
-
34
-
35
-
36
-
37
-
38
-
39
-
40
-
41
-
42
-
43
-
44
-
45
-
46
-
47
-
48
-
49
-
50
-
51
-
52
-
53
-
54
-
55
-
56
-
57
-
58
-
59
-
60
-
61
-
62
-
63
-
64
-
65
-
66
-
67
-
68
-
69
-
70
-
71
-
72
-
73
-
74
-
75
-
76
-
77
 |
 |

20
9
Select a
Paper size in printer
.
10
Select the
Number of copies
.
11
Click the
Print Now
button to print the photos.
Using the Lexmark Photo Editor
To open the Lexmark Photo Editor, click
Start
Programs
Lexmark 2300 Series
Lexmark
Photo
Editor
.
You can also open the Lexmark Photo Editor from the All-In-One Center:
1
Select the
Saved Images
tab.
2
Click
Show Folders
to browse to the folder where the saved
images are stored.
3
Click
Hide Folders
to close the folder window.
4
Select the photo(s) you want to edit.
5
From the “Open With...” drop-down menu, select
Lexmark Photo
Editor
.
6
Click
Open Now
.