LiftMaster Icon 26 ICON26 Manual - Page 26
Resident Information, Step 3, Step 4, Step 5
|
View all LiftMaster Icon 26 manuals
Add to My Manuals
Save this manual to your list of manuals |
Page 26 highlights
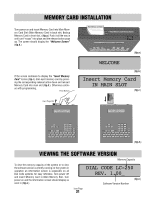
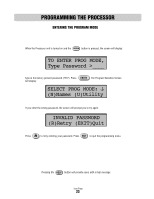
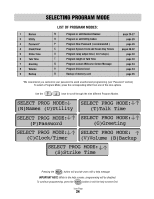
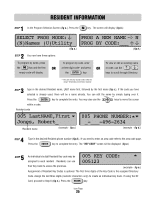
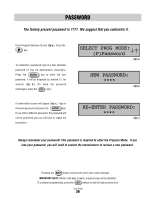
RESIDENT INFORMATION 1 STEP In the Program Selection Screen (fig a.), Press the N key. The screen will display (fig b.): SELECT PROG MODE: PROG A NEW NAME N (N)Names (U)Utility PROG BY CODE:___ (fig a.) (fig b.) 2 STEP You now have three options: To program by name, press To program by code, enter To view or edit an existing name the N key and the first OR a three digit code* and press OR or code, use the empty code will display. the key. keys to scroll through Directory. * The unit will only accept codes within it's range - depending on memory capacity. 3 STEP Type in the desired Resident name, LAST name first, followed by the first name (fig c.). If the code you have selected is already used, there will be a name already. You can edit the name by simply typing over it. Press the key to complete the entry. You may also use the keys to move the cursor within a code. Resident code 005 LastNAME,First Jones, Robert_ Resident name (example - fig c.) 005 PHONE NUMBER: _-___-496-2634 (example - fig d.) 4 STEP Type in the desired Resident phone number (fig d.). If you need to enter an area code refer to the area code page. Press the key to complete the entry. The "KEY CODE" screen will be displayed. (fig e.) 5 STEP 005 KEY CODE: An individual six digit Resident Key code may be assigned to each resident . Residents can use 005123 their Key Code to access the premises. (example - fig e.) Assignment of Resident Key Codes is optional. The first three digits of the Key Code is the assigned Directory Code. Assign the last three digits (numeric characters only) to create an individual Key Code. If using the RF Card, proceed to Step 6 (fig e.). Press the key. Icon Page 25
-
 1
1 -
2
-
3
-
4
-
5
-
6
-
7
-
8
-
9
-
10
-
11
-
12
-
13
-
14
-
15
-
16
-
17
-
18
-
19
-
20
-
 21
21 -
 22
22 -
 23
23 -
 24
24 -
 25
25 -
 26
26 -
 27
27 -
 28
28 -
 29
29 -
 30
30 -
 31
31 -
32
-
33
-
34
-
35
-
36
-
37
-
38
-
39
-
40
-
41
-
42
-
43
-
44
 |
 |