LiftMaster Icon 26 ICON26 Manual - Page 6
Resident Use Continued - access
|
View all LiftMaster Icon 26 manuals
Add to My Manuals
Save this manual to your list of manuals |
Page 6 highlights
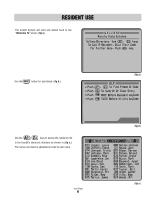
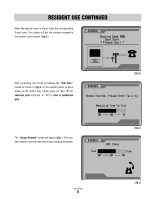
RESIDENT USE CONTINUED When the desired name is found, enter the corresponding 3-digit code. The system will dial the number assigned to the resident code entered. (fig d.) STATUS After connecting, the screen will display the "Talk Time" screen as shown in (fig e.) If the resident wants to allow access to the visitor, they simply press (or dial) "9" for vehicular gate entrances, or "5" for door or pedestrian gate . STATUS The "Access Granted" screen will appear (fig f.). If the resident wants to deny access, they simply hang up the phone. STATUS (fig d.) (fig e.) Icon Page 5 (fig f.)
-
 1
1 -
 2
2 -
 3
3 -
 4
4 -
 5
5 -
 6
6 -
 7
7 -
 8
8 -
 9
9 -
 10
10 -
 11
11 -
 12
12 -
13
-
14
-
15
-
16
-
17
-
18
-
19
-
20
-
21
-
22
-
23
-
24
-
25
-
26
-
27
-
28
-
29
-
30
-
31
-
32
-
33
-
34
-
35
-
36
-
37
-
38
-
39
-
40
-
41
-
42
-
43
-
44
 |
 |
5
Icon Page
RESIDENT USE CONTINUED
STATUS
STATUS
After connecting, the screen will display the
“Talk Time”
screen as shown in (
fig e.
) If the resident wants to allow
access to the visitor, they simply press (or dial)
“9”
for
vehicular gate
entrances, or
“5”
for
door or pedestrian
gate .
The
“Access Granted”
screen will appear (
fig f.
). If the res-
ident wants to deny access, they simply hang up the phone.
(
fig e.
)
(
fig f.
)
(
fig d.
)
When the desired name is found, enter the corresponding
3-digit code. The system will dial the number assigned to
the resident code entered. (
fig d.
)
STATUS