LiftMaster LM21XPBB LM21XPBB Manual - Page 4
IMPORTANT INSTALLATION INSTRUCTIONS, To reduce the risk of SEVERE INJURY or DEATH
 |
View all LiftMaster LM21XPBB manuals
Add to My Manuals
Save this manual to your list of manuals |
Page 4 highlights
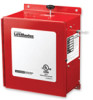
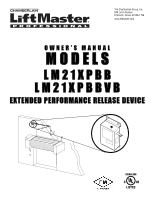
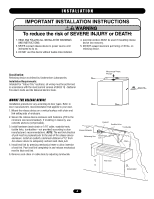
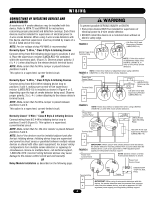
NING ON I N S TA L L AT I O N WARNING IMPORTANT INSTALLATION INSTRUCTIONS WARNING To reduce the risk of SEVERE INJURY or DEATH: 1. READ AND FOLLOW ALL INSTALLATION WARNINGS AND INSTRUCTIONS. 2. NEVER connect release device to power source until instructed to do so. 3. DO NOT use this device without fusible links installed. 4. Concrete anchors MUST be used if mounting release device into masonry. 5. DO NOT exceed maximum pull rating of 40 lbs. on releasing device. SEMENT AVERTISSEMENT Mechanical Reset Classification: Plunger TION AVERTISSEMENT Releasing device as defined by Underwriters Laboratories. Installation Requirements: Intended for "Indoor Dry" locations; all wiring must be performed in accordance with the most current version of NFPA 72 - National Fire Alarm Code and the National Electric Code. End Link MOUNT THE RELEASE DEVICE Installation procedures vary according to door types. Refer to door manufacturer's recommendation that applies to your door. 1. Mount the release device on a vertical surface with chain end link exiting side of enclosure. 2. Secure the release device enclosure with fasteners (#10 is the minimum size recommended). If installing in masonry, use concrete anchors (not provided). Eyebolt 3. Install hardware (sash chain or 1/16" cable, eyebolts-hook, fusible links, turnbuckles-not provided) according to door Smoke Detector TENCIA ADVERTENCIA manufacturer's recommendations. NOTE: The end link direction of pull must be perpendicular to the side of the release device Releasing Unit Chain End enclosure. Install an eyebolt a minimum distance of 12" from Link the release device to adequately redirect sash chain pull. CIÓN ADVERTENCIA 4. Install end link by pressing mechanical reset to allow insertion of end link. Push end link completely in and release mechanical reset to latch end link. 5. Remove sash chain or cable slack by adjusting turnbuckle. Fusible Links Turnbuckle Chain Fire Door Annunciator 4
-
 1
1 -
 2
2 -
 3
3 -
 4
4 -
 5
5 -
 6
6 -
 7
7 -
 8
8 -
 9
9 -
 10
10 -
11
-
12
-
13
-
14
-
15
-
16
 |
 |