LiftMaster MEGA ARM / MEGA ARM TOWER MATDCBB Green Control Board V.6.4 or newe - Page 9
Reversing Arm Direction, Reversing The Direction Of The Arm
 |
View all LiftMaster MEGA ARM / MEGA ARM TOWER manuals
Add to My Manuals
Save this manual to your list of manuals |
Page 9 highlights
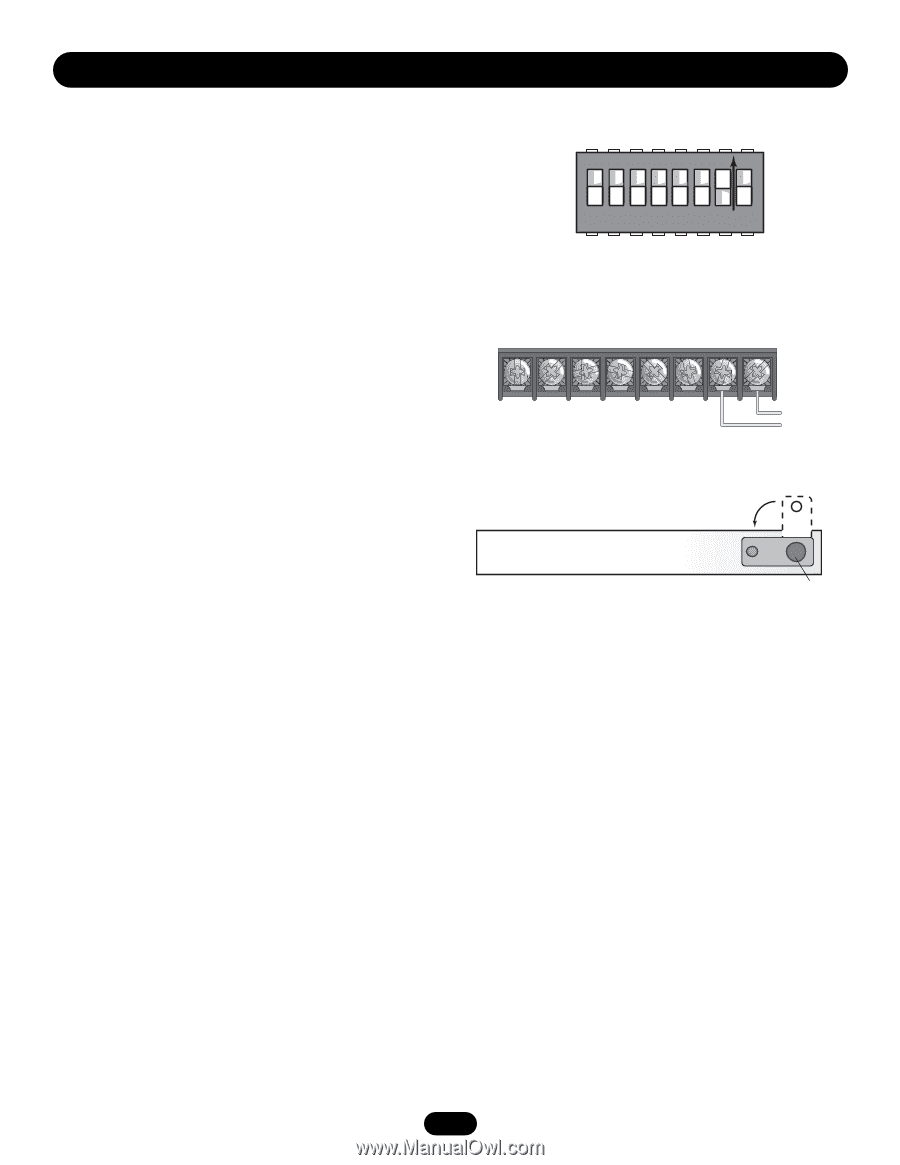
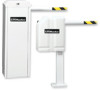
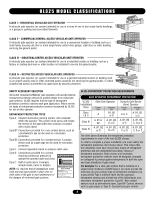
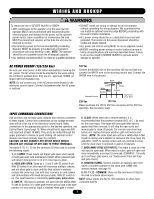
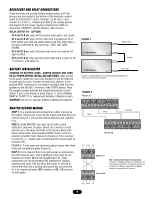
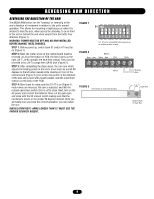
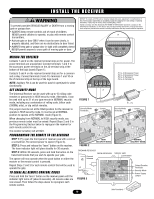
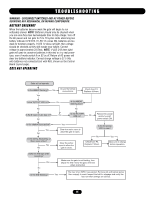
REVERSING ARM DIRECTION REVERSING THE DIRECTION OF THE ARM The MEGA ARM allows for the "handing" or reversing of the arm's direction of movement in relation to the unit's normal operation. This allows for mounting in tight places or when it is desired to have the arm, when across the driveway, to be in front of the unit or behind the unit when viewed from the traffic flow direction (Figure 1). WARNING: POWER MUST BE OFF AND NO ARM INSTALLED BEFORE MAKING THESE CHANGES. STEP 1: Before power up, switch bank S1 switch #7 must be on (Figure 1). STEP 2: Next, the motor wires on the control board must be reversed. At J4 on the bottom of PCB, the last 2 wires on the right (J4-7, J4-8) normally are blue then orange. They must be reversed to be (J4-7) orange then (J4-8) blue (Figure 2). STEP 3: After completing the steps above, the cam arm which adjusts the limiting points of the arm's travel must be turned 90 degrees to the left when viewed while standing in front of the control board (Figure 3) (cam arrow now points in the direction of the arm and is level with mount bracket, note the small limit sensors on the back of the PCB). STEP 4: Now check to make sure that S1 #7 is on (Figure 1), motor wires are reversed, the cam is adjusted, and that the manual open/close switch (S3) is set to close. Next, turn on the AC power and connect the batteries. Now run the gate open and close with the S3 manual switch making sure that the mechanism travels in the proper 90 degrees desired. Once you are totally sure you have the correct operation, you can install the arm INSTALLATION NOTE: ARMS LONGER THAN 12' MUST USE THE PROPER COUNTER WEIGHT. FIGURE 1 S1 ON 12345678 S1, #7 to be turned ON before power up to enable reverse of arm. FIGURE 2 Battery Acc+ Acc- Black Red Xfmr Motor Yellow Orange Blue FIGURE 3 Arm shown in reversed direction. Cam Arm Output Shaft of Gear Box 9
-
 1
1 -
2
-
3
-
 4
4 -
 5
5 -
 6
6 -
 7
7 -
 8
8 -
 9
9 -
 10
10 -
 11
11 -
 12
12 -
 13
13 -
 14
14 -
15
-
16
-
17
-
18
-
19
-
20
-
21
-
22
-
23
-
24
 |
 |