LiftMaster MJ MJ5011E Installation-2008 Manual - Page 20
Testing, Test 3-button Control Station, Test Limit Adjustment, Test The Safety Devices If Installed
 |
View all LiftMaster MJ manuals
Add to My Manuals
Save this manual to your list of manuals |
Page 20 highlights
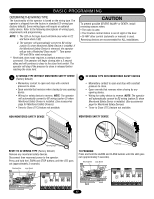
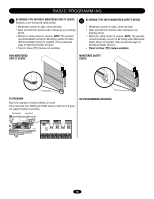
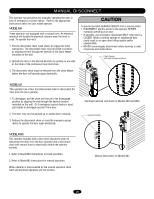
WARNING TESTING WARNING CAUTION Turn on power, LED will flash 7 times on power up. Test all controls and safety devices to make sure they are working properly. It may be necessary to refer back to the Adjustment section for adjustment of the limits. IMPORTANT NOTES: • Do not leave power to the operator on unless all safety and entrapment protection devices have been tested and are working properly. • Be sure you have read and understand all safety instructions included in this manual. • Be sure the owner or person(s) responsible for operation of the door have read and understand the safety instructions, know how to electrically operate the door in a safe manner and how AtoVmEanuRallyTdIisScoSnneEct MtheEdooNr fTrom the operator. TEST 3-BUTTON CONTROL STATION ATTENTION 1. Press OPEN button. (The door should move in the open direction.) 2. Press STOP button. (The door should stop.) 3. Press CLOSE button. (The door should move in the close direction.) 4. Release CLOSE button. Door should stop if in C2 mode. (The door should continue closing if in B2 mode.) 5. Press STOP button. (The door should stop.) TEST LIMIT ADJUSTMENT 1. Press OPEN button. (The door should open.) 2. Allow the door to fully open. 3. Press CLOSE button. (The door should close.) 4. Allow the door to fully close. 5. If the limits are not set properly, remove power and adjust limits (refer to Adjustment section). WARNING To avoid SERIOUS PERSONAL INJURY or DEATH from electrocution, disconnect ALL electric power BEFORE performing ANY maintenance. TEST THE SAFETY DEVICES (IF INSTALLED) 1. Open the door. 2. Place an obstruction in the path of the photo eyes or sensing edge. 3. Press the CLOSE button. The door should not close if photo eyes are installed. The door AVERTISSEMENT should close to obstruction and reverse if sensing edge is installed. 4. Remove the obstruction. 5. Press CLOSE button. Door should close. AVERTISSEMENT If door did not reverse from obstruction, check safety devices. TEST REMOTE CONTROL * Requires B2 wiring type and compatible LiftMaster remote control. In C2 wiring the remote control will open the door only. 1. Press remote control button. 2. Door should open. Allow the door to fully open. 3. Press remote control button. 4. Door should close. Allow door to fully close. ADVERTENCIA PRECAUCIÓN ADVERTENCIA ADVERTENCIA 20
-
 1
1 -
2
-
3
-
4
-
5
-
6
-
7
-
8
-
9
-
10
-
11
-
12
-
13
-
14
-
 15
15 -
 16
16 -
 17
17 -
 18
18 -
 19
19 -
 20
20 -
 21
21 -
 22
22 -
 23
23 -
 24
24 -
 25
25 -
26
-
27
-
28
-
29
-
30
-
31
-
32
 |
 |