LiftMaster Miracle-One MIRACLE ONE Manual - Page 13
Step 4 con't, Step 5, Important, Caution - operators
 |
View all LiftMaster Miracle-One manuals
Add to My Manuals
Save this manual to your list of manuals |
Page 13 highlights
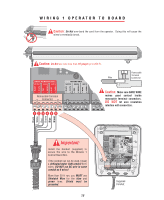
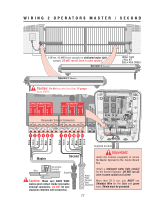
PROCEDURE FOR INSTALLATION Mounting Instructions Step 4 (con't): The gate must be in the closed position. Make sure the operator is kept level while tack welding the front and back steel brackets and reinforcement steel plates in position. After all tack welding is finished, remove the operator! Refer to Step 6 Refer to Step 7 2.25" Vertical Height Difference Step 5: With the operator removed, completely weld around the brackets and plates on the gate. Caution: Welding the brackets with the operator attached to the gate may damage the operator. Step 6: Remove the nut, bolt and bushing from the back operator bracket. Place the metal bushing in the hole of the steel bracket that will be used. Secure operator with the nut and bolt (See Below). Step 7: Remove the nut from the traveler carriage at the front of the operator. Secure operator to the front bracket with the washer and nut (See Below). Metal Bushing Back Bracket Important: Washer Must be placed between traveler carriage and TOP of front bracket. Important: These nuts MUST be tight or unit will not work correctly! Traveler Carriage Front Bracket 12
-
 1
1 -
2
-
3
-
4
-
5
-
6
-
7
-
 8
8 -
 9
9 -
 10
10 -
 11
11 -
 12
12 -
 13
13 -
 14
14 -
 15
15 -
 16
16 -
 17
17 -
 18
18 -
19
-
20
-
21
-
22
-
23
-
24
-
25
-
26
-
27
-
28
-
29
-
30
-
31
-
32
-
33
-
34
-
35
-
36
-
37
-
38
-
39
-
40
-
41
-
42
-
43
-
44
-
45
-
46
-
47
-
48
-
49
 |
 |
