LiftMaster Miracle-One MIRACLE ONE Manual - Page 25
LOOP INSTALLATION AND NUMBER OF WIRE TURNS, Loop Installation Saw Cut Type
 |
View all LiftMaster Miracle-One manuals
Add to My Manuals
Save this manual to your list of manuals |
Page 25 highlights
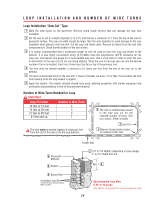
LOOP INSTALLATION AND NUMBER OF WIRE TURNS Loop Installation "Saw Cut" Type 1 Mark the loop layout on the pavement. Remove sharp inside corners that can damage the loop wire insulation. 2 Set the saw to cut to a depth (typically 2" to 2.5") that insures a minimum of 1" from the top of the wire to pavement surface. The saw cut width should be larger than the wire diameter to avoid damage to the wire insulation when placed in the saw slot. Cut the loop and feeder slots. Remove all debris from the slot with compressed air. Check that the bottom of the slot is even. 3 It is highly recommended that a continuous length of wire be used to form the loop and feeder to the detector. It is also highly recommend using 12-18 AWG cross-link polyethylene (XLPE) insulation for the loop wire. Use heavier wire gauge for a more durable loop area. Use a wood stick or roller to insert the wire to the bottom of the saw cut (Do not use sharp objects). Wrap the wire in the loop saw cut until the desired number of turns is reached. Each turn of wire must lay flat on top of the previous turn. 4 The wire must be twisted together a minimum of 6 twists per foot from the end of the saw cut to the detector. 5 The wire must be held firmly in the slot with 1" pieces of backer rod every 1 to 2 feet. This prevents the wire from floating when the loop sealant is applied. 6 Apply the sealant. The sealant selected should have good adhering properties with similar expansion and contraction characteristics to that of the pavement material. Number of Wire Turns Needed for Loop Important Loop Perimeter 10 feet to 13 feet 14 feet to 26 feet 27 feet to 80 feet 81 feet and up Number of Wire Turns 4 3 2 1 3 The wire is continuously wound in the loop saw cut for the required number of turns. One turn shown. (Refer to table) The wire must be twisted together 6 twists per foot from the end of the saw cut to the loop detector. 2 Saw Cut 1 Remove sharp inside corners by making corner cuts 6 Pavement Material 6 Sealant 5 Backer Rod Insulated Loop Wire 3 turns Shown, amount varies. Refer to table Feeder Slot 2 1/8" to 1/4" Width, (depending on wire gauge) 2" to 2.5" Depth Saw Cut Min 1" 5 Recommended Loop Wire XLPE 12-18 gauge (Use heavier wire gauge for a more durable loop area) 24
-
 1
1 -
2
-
3
-
4
-
5
-
6
-
7
-
8
-
9
-
10
-
11
-
12
-
13
-
14
-
15
-
16
-
17
-
18
-
19
-
 20
20 -
 21
21 -
 22
22 -
 23
23 -
 24
24 -
 25
25 -
 26
26 -
 27
27 -
 28
28 -
 29
29 -
 30
30 -
31
-
32
-
33
-
34
-
35
-
36
-
37
-
38
-
39
-
40
-
41
-
42
-
43
-
44
-
45
-
46
-
47
-
48
-
49
 |
 |
