LiftMaster Miracle-One MIRACLE ONE Manual - Page 15
Adjusting the Limit Switches, Step 11
 |
View all LiftMaster Miracle-One manuals
Add to My Manuals
Save this manual to your list of manuals |
Page 15 highlights
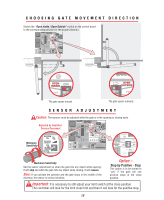
PROCEDURE FOR INSTALLATION Adjusting the Limit Switches Step 11: Adjust the travel distance of the gate with the limit switches. Loosen the 2 screws of each limit switch armature. Slide to adjust. Position the outside limit switches of each armature to stop the gate in the "full open" and "full closed" positions. Re-tighten armature screws when gate positions are correct. Limit Switch Armature Adjustment Screws Outside Limit Switch Inside Limit Switch Adjustment Screws Inside Limit Switch Outside Limit Switch Limit Switch Armature Step 12: Reinstall the operator cover with the 4 screws to complete the installation. 14
-
 1
1 -
2
-
3
-
4
-
5
-
6
-
7
-
8
-
9
-
 10
10 -
 11
11 -
 12
12 -
 13
13 -
 14
14 -
 15
15 -
 16
16 -
 17
17 -
 18
18 -
 19
19 -
 20
20 -
21
-
22
-
23
-
24
-
25
-
26
-
27
-
28
-
29
-
30
-
31
-
32
-
33
-
34
-
35
-
36
-
37
-
38
-
39
-
40
-
41
-
42
-
43
-
44
-
45
-
46
-
47
-
48
-
49
 |
 |

Step 11:
Adjust the travel distance of the gate with the
limit switches. Loosen the 2 screws of each limit switch
armature. Slide to adjust. Position the
outside limit switches
of each armature to stop the gate in the
“full open”
and
“full closed”
positions. Re-tighten armature screws when gate positions are correct.
Step 12:
Reinstall the operator cover with the 4 screws to
complete
the installation.
Outside Limit
Switch
Outside Limit Switch
Inside Limit
Switch
Inside Limit Switch
Limit Switch
Armature
Limit Switch Armature
Adjustment Screws
Adjustment Screws
PROCEDURE FOR INSTALLATION
Adjusting the Limit Switches
14