Linksys BEFW11S4-RM User Guide - Page 11
Your Wireless Access Point + Cable/DSLRouter is now con d - password
 |
UPC - 745883578177
View all Linksys BEFW11S4-RM manuals
Add to My Manuals
Save this manual to your list of manuals |
Page 11 highlights
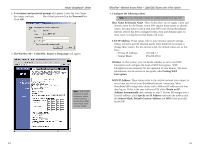
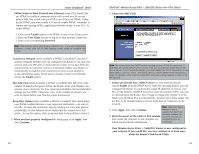
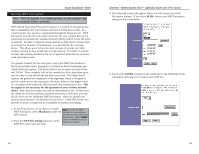
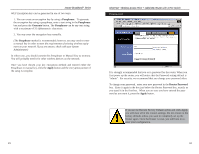
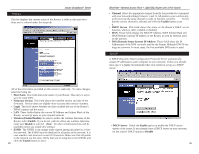
Instant BroadbandTM Series PPPoE (Point-to-Point Protocol over Ethernet) Some DSL-based ISPs use PPPoE to establish communications with an end-user. If you are using a DSL line, check with your ISP to see if they use PPPoE. If they do use PPPoE, you must enable it. If you do enable PPPoE, remember to remove any existing PPPoE applications already on any of your PCs. To enable PPPoE: 1. Click on the Enable option in the PPPoE section of the Setup screen. 2. Enter the User Name you use to log on to your Internet connection. 3. Enter your corresponding Password. Note: RAS Settings are for Singapore customers only. If you are a Singapore customer, contact your ISP for RAS Settings before trying to complete this screen. Connect on Demand (Only available if PPPoE is enabled) If you aren't actively using the Internet, you can configure your Router to cut your connection with your ISP after a certain period of time. If you have been disconnected due to inactivity, Connect on Demand enables your Router to automatically re-establish your connection as soon as you attempt to access the Internet again. If you wish to activate Connect on Demand, choose the Enable option. Max Idle Time (Only available if PPPoE is enabled) Max Idle Time is the number of minutes that passes before the Router drops your Internet connection, due to inactivity. For best connection reliability, the recommended settings are 0 or 9999. Otherwise, enter in the number of minutes you want to elapse before your Internet access disconnects. Keep Alive Option (Only available if PPPoE is enabled) This option keeps your PPPoE-enabled Internet access connected indefinitely, even when it sits idle. It keeps the connection alive by sending out a few data packets periodically, so your Internet service thinks that the connection is still active. To use this option, click on the box next to Keep Alive to select it. 5. When you have properly configured the Setup page, click Apply, then click Continue. 15 EtherFast® Wireless Access Point + Cable/DSL Router with 4-Port Switch 6. Choose the DHCP tab. Note: You cannot have two DHCP servers running on one LAN at the same time. If you have an existing DHCP server on your LAN, you must decide which device will act as server. If you choose this Router, you must disable the DHCP capabilities of the other device, and vice versa. The device which is not the DHCP server must have a static IP address, which must be compatible with your existing network in order to be recognized. 7. Unless you already have a DHCP server on your internal network, choose Enable from the DHCP Server field. By choosing Enable, you will configure the Router to automatically assign IP addresses to each of your PCs. In the Number of DHCP Users box, enter the number of PCs you plan on networking to the Router. Don't forget to change this number if, in the future, you add more PCs to your network. In most cases, these values will not have to be changed unless you have more than 50 computers on the network. Note: Make sure that a 8. Click Apply, then click Continue. Network Card or adapter has been suc- cessfully installed into 9. Reset the power on the cable or DSL modem, each PC you plan on then restart the computer so the computer can configuring prior to obtain the new Router information. continuing. Your Wireless Access Point + Cable/DSL Router is now configured to your network. If you would like, you may continue on to learn more about the Router's Web-based Utility. 16
-
 1
1 -
2
-
3
-
4
-
5
-
 6
6 -
 7
7 -
 8
8 -
 9
9 -
 10
10 -
 11
11 -
 12
12 -
 13
13 -
 14
14 -
 15
15 -
 16
16 -
17
-
18
-
19
-
20
-
21
-
22
-
23
-
24
-
25
-
26
-
27
-
28
-
29
-
30
-
31
-
32
-
33
-
34
-
35
 |
 |
