Linksys BEFW11S4-RM User Guide - Page 12
The Wireless Access Point, Cable/DSL Router's Web-based, Utility - firmware
 |
UPC - 745883578177
View all Linksys BEFW11S4-RM manuals
Add to My Manuals
Save this manual to your list of manuals |
Page 12 highlights
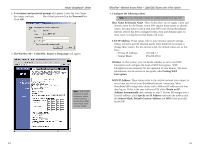
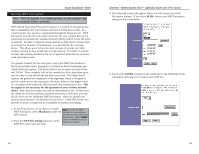
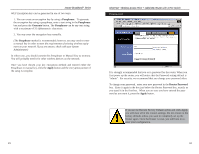
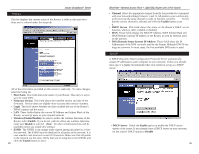
Instant BroadbandTM Series The Wireless Access Point + Cable/DSL Router's Web-based Utility Quick & Easy Administration For your convenience, an administrative utility has been programmed into the chipset of your router. All router-based administrative tasks are performed through this web utility. The web utility can be accessed by any PC on the network by typing http://192.168.1.1 into the PC's web browser address window. Upon entering the address into the web browser, a password request page will pop up. Leave the User Name field empty, but type "admin" into the Password field. On the following pages you will find brief descriptions of each utility webpage and each page's more important functions. More detailed explanations and instructions can be found by clicking each page's Help button. To clear any values you've entered on any page, click Cancel and re-enter information. To apply any settings you've altered on any page, click the Apply button. Once all settings are correct, click Continue. 17 EtherFast® Wireless Access Point + Cable/DSL Router with 4-Port Switch Setup Note: The Setup page shown in this graphic may differ from the one seen on your router. The Basic Setup screen is the first screen you will see when you access the Utility. If you have already installed and setup your router, you have already seen this screen and have already properly configured all of the screen's values. • Host Name This entry is necessary for some ISPs. Ask your ISP. • Domain Name This entry is necessary for some ISPs. Ask your ISP. • Firmware Version This entry shows the version of the firmware you are using. Future versions of the Router's Firmware may become available on the Linksys Website. • LAN IP Address and Subnet Mask The IP Address and Subnet Mask of the router as it is seen on the internal LAN. The default value is 192.168.1.1 for IP and 255.255.255.0 for Subnet Mask. Unless you already know your settings, we recommend that you keep the defaults. • Wireless (Enable/Disable). In order to utilize the wireless functions of the Router, select Enable. If you do not wish do utilize any wireless functions, make sure Disable is selected. (Note: No other wireless functions will be available unless you enable this setting.) 18
-
 1
1 -
2
-
3
-
4
-
5
-
6
-
 7
7 -
 8
8 -
 9
9 -
 10
10 -
 11
11 -
 12
12 -
 13
13 -
 14
14 -
 15
15 -
 16
16 -
 17
17 -
18
-
19
-
20
-
21
-
22
-
23
-
24
-
25
-
26
-
27
-
28
-
29
-
30
-
31
-
32
-
33
-
34
-
35
 |
 |
